
In late 2020, Apple released the first set of computers made with their own processors, dubbed “Apple Silicon”. The first new chip released was the entry-level processor called the M1, and it honestly lives up to the hype. As an entry-level processor, it performs similarly to the top-end MacBook Pro’s with Intel chipsets, and even competes with many of the larger iMacs for performance. To get similar performance from an Intel Mac is double or even triple the cost of an M1 computer. If an organization budgeted $2899 for a new iMac to run ProPresenter on 4 screens plus live streaming, now the same scenario can be accomplished on a $799 M1-based Mac Mini. That’s an insane amount of performance for the price!
Update: in Fall 2021 Apple released two new MacBook Pro’s with M1 chips: the M1 Pro and M1 Max. Starting at $2000 and $3500 respectively, the M1 Pro can natively support 3 displays (built-in screen + 2 external), and the M1 Max can natively support 5 displays (built-in screen + 4 external). This article is to add more displays than a system officially supports, and the examples listed are based on the original M1 release, which only supports 2 displays.
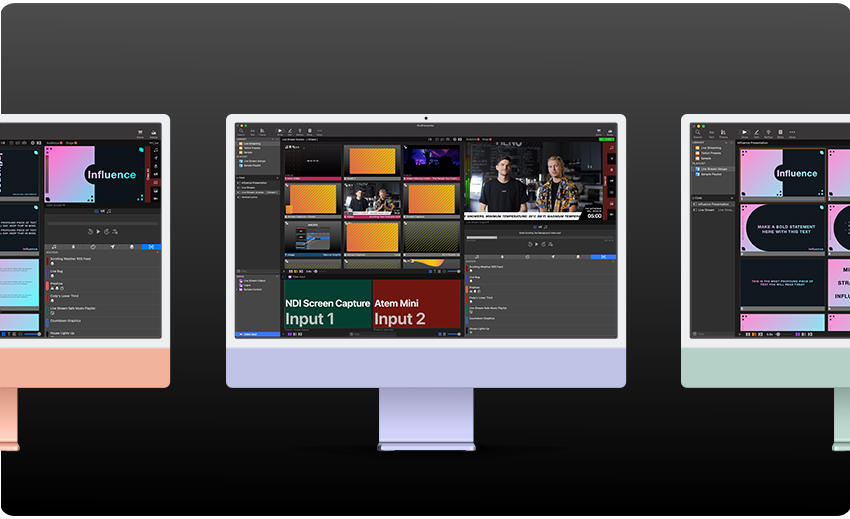
Here is where some costs get added back to the equation. The M1 chips currently only support 2 graphics outputs. That means natively, macOS is only ever going to detect up to two screens. If your device includes a built-in screen, like an iMac, that counts as one of those screens. Meaning, you’d only get a total of one external screen that you could connect to your M1-based computer. However, as a professional video solution, ProPresenter integrates with some hardware that uses “video outputs” instead of “graphic outputs”. While the computer recognizes “graphics” outputs as additional desktop displays, the “video” outputs we are speaking of (mostly through Blackmagic Decklink and UltraStudio hardware) are only used by software that is specifically written for them (meaning that the operating system does not treat them as it does graphics outputs). As such, video outputs are not encumbered by the operating system, and the M1 hardware limitations won’t play a role in how many screens you can use. Here is a look at video vs graphic outputs.
All of this means extra costs to an M1 computer that you may not have needed with an Intel machine. But regardless, if an M1 is powerful enough for your production, you’ll likely still save a lot of money over a Mac configured with Intel’s chipset.
COSTS YOU MAY NEED TO PLAN FOR
BASIC COMPUTER ACCESSORIES
If you purchase a Mac Mini, it won’t come with some basic accessories. For example, a Mac Mini also needs:
- Keyboard
- Mouse
- External Display for the operator
AUDIENCE & STAGE SCREEN OUTPUTS
How many screens you plan to present to and the type of cabling to reach those screens will directly affect what hardware route you take. We usually recommend SDI as your delivery method, as it is the broadcast industry standard, can be used across long distances, is fairly inexpensive, and has excellent reliability and quality. If your display devices only accept HDMI, SDI to HDMI converters are inexpensive and widely available. Just run SDI to the display, connect the adaptor, and use a short HDMI cable. For just 1 additional output, the Blackmagic UltraStudio Monitor 3G outputs either HDMI and SDI. If you need a key/fill signal, you might opt for the UltraStudio HD Mini with which ProPresenter can generate a separate key and fill signals.
If your setup already has multiple SDI cable runs, or if you plan to eventually switch to SDI and will use 3 or more presentation screens (or a Key/Fill and additional outputs), then a Blackmagic Decklink Duo 2 (up to 4 SDI inputs/outputs) or Decklink Quad 2 (up to 8 SDI inputs/outputs) is an excellent choice. Both of these PCIe cards can be connected via Thunderbolt to any of the M1 processor Macs with an external PCIe enclosure. Renewed Vision sells these as a bundle to make this process easier.
Example Scenarios
EXISTING HDMI BASED CABLE RUNS
All “Operator” displays referenced below will use the computer’s built-in display (for iMacs or MacBooks), or a graphics output (for the mac mini)
1 Operator // 1 Projector // 1 Confidence Monitor
1x UltraStudio Monitor 3G; USB-C to HDMI adapter (Around $130)
1 Operator // 1 Projector // 1 Teaching TV // 1 Confidence Monitor
Decklink Duo 2 + External Enclosure + 3x SDI to HDMI Converters (Around $1040)
1 Operator // 1 Projector // 1 Teaching TV // 1 Confidence Monitor / 1 Video Input
Decklink Duo 2 + External Enclosure + 4x SDI to HDMI Converters (Around $1125)
1 Operator // 3 Projectors (Triple Wide Screen) // 1 Confidence Monitor
Decklink Duo 2 + External Enclosure + 4x SDI to HDMI Converters (Around $1125)
1 Operator // 3 Projectors (Triple Wide Screen) // 1 Teaching TV // 1 Confidence Monitor // 1 Video Input
Decklink Quad 2 + External Enclosure + 5x SDI to HDMI Converters + 5 BNC Female to Din Cables (Around $1885)
1 Operator // 3 Projectors (Triple Wide Screen) // 1 Teaching TV // 1 Confidence Monitor // 1 Video Input // 1 Key // 1 Fill
Decklink Quad 2 + External Enclosure + 7x SDI to HDMI Converters + 7 BNC Female to Din Cables (Around $2085)
EXISTING SDI BASED CABLE RUNS
1 Operator // 1 Projector (SDI) // 1 Confidence Monitor (HDMI)
1x UltraStudio Monitor 3G; USB-C to HDMI adapter (Around $130)
1 Operator // 1 Projector // 1 Teaching TV // 1 Confidence Monitor
Decklink Duo 2 + External Enclosure (Around $785)
1 Operator // 1 Projector // 1 Teaching TV // 1 Confidence Monitor // 1 Video Input
Decklink Duo 2 + External Enclosure (Around $785)
1 Operator // 3 Projectors (Triple Wide Screen) // 1 Confidence Monitor
Decklink Duo 2 + External Enclosure (Around $785)
1 Operator // 3 Projectors (Triple Wide Screen) // 1 Teaching TV // 1 Confidence Monitor // 1 Video Input
Decklink Quad 2 + External Enclosure + 6 BNC Female to Din Cables (Around $1375)
1 Operator // 3 Projectors (Triple Wide Screen) // 1 Teaching TV // 1 Confidence Monitor // 1 Video Input // 1 Key // 1 Fill
Decklink Quad 2 + External Enclosure + 8 BNC Female to Din Cables (Around $1405)
WHICH HARDWARE SHOULD I BUDGET FOR?
Start by figuring out how many screens you plan to present to and how many stage screens (confidence monitors) you need. If it’s just one audience screen and one stage screen, then you can use the M1’s regular display output for one screen, and a Blackmagic UltraStudio 3G Monitor for the other. If you plan to use three or more external presentation screens then it is worth upgrading to the Blackmagic Decklink Duo 2 + External Enclosure.
THE “iffy” ALTERNATIVE: DisplayLink
If you start searching online for ways to get around the M1 hardware limitations, you might see recommendations for DisplayLink hubs or adapters (not to be confused with DisplayPort, which is completely different).
DisplayLink is a driver technology from a third-party company to run on top of macOS, and allow your Mac to add more displays than it’s normally able to. If your Mac is limited to two displays, with a DisplayLink-based hub, you can get around this limitation. However, this is not ideal for a number of reasons. First, DisplayLink is not directly supported by Apple or Renewed Vision so if you ever have a problem getting a video signal through these devices, you won’t be able to ask Apple or Renewed Vision for technical support to get these outputs running. The performance of these adaptors is also significantly lower than native graphics outputs so these adaptors should not be used for audience-facing displays, otherwise, you might have undesired performance issues. Further, updates to the operating system frequently break the DisplayLink drivers, so should you go down this path, be sure to turn all “auto-update” functions off.
All of that said, there are hundreds of ProPresenter users that have used DisplayLink adaptors for their Stage Displays for years without issue. Just be aware of what you’re getting into should you choose this path.
ALTERNATIVE OUTPUTS FOR AUDIENCE & STAGE SCREENS
CREATE ADDITIONAL AUDIENCE & STAGE SCREENS WITH NDI
NDI stands for Network Device Interface. It allows video and audio to be sent over the network (or even internally on the same computer) from one device to another. In most cases, NDI needs a gigabit network or better for best performance. With NDI, the more NDI feeds you use, the more processing power that is required from your devices. NDI is commonly used on computers and some video switchers, but there is also hardware that converts NDI to HDMI or SDI connections.
Here’s an example of how it works: you create an NDI audience screen in ProPresenter, and any other NDI receiving device (a computer, or various devices on your network) can see that display output on the network. One popular solution for adding an additional screen is using an Apple TV with the NDI Monitor TV App. A newly released option is the BirdDog PLAY 4K player for $149, which has an HDMI output.
CREATE STAGE SCREENS WITH THE PROPRESENTER STAGE APP

The ProPresenter Stage App is only US$9.99 and can be run on Android, iOS, iPadOS, and tvOS. Have an extra iPhone collecting dust? For an additional Stage Screen, you could get an HDMI adapter for your iPhone, run the Stage App, and plug it into a TV. Similarly, you could run the Stage App directly from an Apple TV to display lyrics to your on-stage talent.
Taking all these options into consideration, using multiple screens with ProPresenter and Apple Silicon (M1 processor) can be affordable and easy to accomplish. HDMI, SDI, NDI, Stage App — there are multiple ways to get Audience and Stage screens out of ProPresenter. Between the built-in graphics outputs, the UltraStudio 3G Monitor, the DeckLink Duo 2 or Quad 2, NDI connections, or even the ProPresenter Stage App, there is a solution for everyone.

Stay Updated with Our Newsletter
Get the latest news, updates, and exclusive offers delivered straight to your inbox.

Questions?
Browse our FAQs or our Knowledge base that we’ve made to answer your questions. Need additional help? Connect with a support team agent!
What’s included in a ProScoreboard subscription?
A subscription gives you access to ongoing updates ensuring your software always stays current, a ProContent starter pack customized to your teams colors to enhance your game-day visuals, editable scoring templates with ready-to-go layouts you can easily tweak, video tutorials and 7-days a week support.
How is ProScoreboard different from traditional systems?
Traditional systems are often expensive, in a fixed-location, and hard to update. ProScoreboard gives you flexibility, portability, and dynamic visuals at a fraction of the cost… all while working on hardware you already own.
Does ProScoreboard work for multiple sports?
One license, multiple sports. Switch between custom layouts in seconds, making it perfect for schools and venues that host a variety of athletic events. ProScoreboard is built for versatility; supporting football, basketball, baseball, volleyball, soccer, hockey, tennis, lacrosse, Australian football, and more. Each sport has a purpose-built layout with the correct rules and visuals, so you can create a professional experience for any game.
Can ProScoreboard integrate with existing LED or fixed-digit scoreboards?
Yes. ProScoreboard works with most scoreboard controllers. With just a serial connection and a simple dropdown setting, you can sync your visuals with existing systems- even legacy ones. We’ve done the heavy lifting so your transition is seamless.
Does it work with Scoretables or smaller setups?
Not every gym has a massive LED wall. That’s why we offer a Scoretable Edition, built specifically for tabletop displays at a lower cost. Run it solo or link it with larger displays. Available through resellers like Boostr, Formetco, and Digital Scoreboards.