
Video Transcription:
Today I’m going to help you, the ProPresenter operator, become a pro at controlling and showing presentations. Now, you might be a volunteer or you might be brand new to ProPresenter and just need a crash course and how to best control and operate the program.
So in this video, I’m going to walk you through the three most important things that you need to know, plus I’ll help you understand all of the features of the program and how to make changes on the fly. ProPresenter is a sophisticated presentation tool, capable of very complex presentations for both in person and online audiences.
But what you’ll see is that operating ProPresenter is actually very easy, and what was designed with you, the operator, in mind. So in this training, we’re going to focus on controlling and operating, but if you want to learn how to create and use different features, you can find more in depth training at propresenter.com. Now, this training works best.
If you have ProPresenter open on your computer and you explore it as I walk you through all the controls. ProPresenter can be used on a Mac or a PC, and you can download the software free of charge, right from the website we recommend and actually encourage you to download the software on your computer so that you can continue to learn at home and edit and create presentations remotely.
So if you don’t have ProPresenter already installed, I want to encourage you to stop this video right now and go download and install it from ProPresenter.com. Since ProPresenter works both on Mac and PC, you may end up controlling ProPresenter on a computer that you don’t normally use, but don’t let that scare you. ProPresenter is the same on each platform. The only thing you need to remember is the difference between the command and control keys.
So if you’re on a PC keyboard shortcuts, for things like copy and paste are control+C or control+V. On the Mac, all of these are command+C or command+V. Beyond that, the interface and the controls are the same on each computer. So if you’re used to a PC and you’re working on a Mac, don’t let that worry you.
And if you’re used to a Mac and you end up on a PC, it’s just as easy as remembering control instead of command. So let’s dive in and take a closer look at that ProPresenter interface. This is the main show view for ProPresenter, but there are multiple other views that you can access from the main toolbar, like edit, reflow, Bibles and a bunch of other editors. Now, this main show view is set up in a logical left to right workflow, where on the left side, you’ll see our different libraries and our different playlists.
And when we select a library or a playlist, you’ll see all of the items inside of that library or playlist. We can select a presentation and then we can click on a slide and we can see it show up in our preview area, showing us exactly what’s being displayed.
Now, libraries are where all of your presentations are saved. So if you’re looking for a slideshow, a song, some teaching notes, those would be saved inside of a library, and you can have multiple libraries to help you better organize your presentations. Now, below your libraries, you’ll see playlists.
Playlists are used for individual events or shows, and each playlist has just the items that you need for that particular show. So you should have a playlist for each event that you do. Now, when we look at our playlist here, you’ll see we have a bunch of different items in here. One thing you’ll see is we have headers and these just help us better break up our playlist to show us different sections of our event.
Now, if we wanted to add in a new item into our playlist, all we would need to do is use the search function. So we can click on search from the main toolbar, or we could hit command or control F on our keyboard to pull up our search window. And then we could start typing in a song title, and then we could just simply drag and drop that right into our playlist. We can also search song select.
So if you have a song select subscription, you can search and find different songs in the database, and then you can click to preview them, and then import them into your local library. I’m going to switch us back over to searching our local library, and then we can X this out to see all of our different presentations inside of our different libraries.
Now, when we select a presentation inside of a playlist or a library, you’ll see it show up in our main view here. And then you can start selecting slides to show them on your outputs. And we can actually click on any slide, in any order that we want, in any presentation that we want. So we could jump over to Goodness of God and go to the course of that song.
And then go to Living Hope, and maybe jump down verse three of that song. And then go to Waymaker, and we could go to the chorus of that song. We can go to any song in any order, because when you’re in show mode, whatever you click goes live. Now, instead of using our mouse to navigate our different songs and items in our playlist, we can use our keyboard, which is much more effective.
So you can use the space bar to go to the next slide, or you can use the right arrow. Now, I recommend using the arrow keys because we can use the right arrow to go to the next slide, the left arrow to go to the previous slide, and then you can use the up and down arrows to switch between different items in your playlist or library. So if I hit the up arrow, it’s going to go to Goodness of God.
And then I could hit the right arrow, and it’s going to go to the first slide in that presentation. So I’ll hit the right arrow and it’s going to go to that first slide. I could hit the right arrow again, and we’re working through our song. We can also jump to different sections in our song using these helpful hot keys.
So C stands for chorus, so I can hit C and it will jump to chorus or B for bridge. And then you can also use the A, S, D and F keys to jump to different verses. So I could hit S for verse two or A for verse one. And if I wanted to jump to a particular slide in a presentation, I could just type it in. So I could hit 10 and enter, and it will jump to that blank slide for me.
So you can see how using those arrow keys and hot keys on your keyboard to navigate presentations makes it really easy, but what’s a little bit more tricky is to know when to actually switch slides. When should you go from one slide to the next? Now, I think there’s two different main types of content that should be shown two different ways.
There’s content that should be shown when it’s said and content that needs to be read ahead. Now, I know it rhymes, but it’s really helpful to remember. So there’s content that needs to be shown when it’s said, and this is typically for speaking presentations, because for speaking presentations, visuals are mostly used to reinforce spoken ideas given by the presenter. So the content can be shown when it’s said by the presenter.
You can typically, as the operator, listen for clues from the presenter to know when to click on different slides. And you should be reading ahead and looking ahead at what slides are next to know what to listen for.
So if I was running slides for this influence presentation, and I was listening to the speaker and they started to say something like, “I just love this quote from,” and I hear the word quote from, I know that they’re probably going to put up a quote on the screen and then I’m just going to listen for maybe who the person is, or the first words of the quote.
So they may say something like, “I love this quote from Nelson Mandela,” and then I’d click on it right away. “The greatest glory in living lies not in never falling, but rising every time we fall.” And after they’re done saying that I might leave it on the screen for a little bit, for people to sink in and maybe reread it, or if they’re explaining it more, why they like it.
And then as they move on to the next point, then I’ll take that off the screen and go back to the title. We could also listen for the first words of it. So I really love this quote. And as soon as they say, don’t, I’d go, don’t judge every day by the harvest you reap, but by the seeds that you plant. And so they would say that quote, and again, after they’re done with that, I could maybe click back to this title slide. So that’s how you could show content when it’s said, but if you’re showing lyrics or doing a participatory presentation, you want to show the slides ahead of when it’s supposed to be read or some. Now, I recommend switching based on the second to last rule.
So what’s the second to last rule? You should switch slides when you get to the second to last word or second to last syllable of the current slide that you’re on. This will allow the audience to read what they need to say or sing before they actually do it. If you’re right on time, it will lead to people not being able to participate because the first words will show as they’re supposed to be said or sung, which makes it really difficult for people to participate.
So if we look at Waymaker here, we’ll click on this first slide, and it says you are here moving in our midst. So that would be our second to last word. So we’re going to say, you are here moving in our midst. I worship you. I worship you. You are here moving in this place, I worship you, I worship you.
Waymaker, miracle worker, promise keeper, light in the darkness. My God, that is who you are. Waymaker, miracle worker, promise keeper, light in the darkness. My God, that is who you are. Now, the amount of text on your slide, the pace of the song, or the tempo can change this.
But the second to last rule is a great starting place for any participatory presentation. When you’re doing a run through before an event or checking the day’s playlist, you might see an error.
This could be a spelling issue, a missing word, or some other problem with the text on the slide. Now, there are two different, easy ways that you can fix those issues by editing your slides.
Now, the first way that we can edit a presentation is by going to edit in the main toolbar, and then we can select our slide. And you can see here that we have a word that’s wrong in our slide. We can click in here and we can edit the text of this slide. We could fix reap and make sure it’s spelled right, or the other way that we can do this is without ever leaving our show mode. We can right click on the slide, and then we can say quick edit.
And when we hit quick edit, it will bring up this quick editor where we can click and edit our slide. And then all we have to do is hit the little close icon here in the corner, and that will close and save that slide out. And now our text has been fixed. So you can either use the main editor or you can right click and use quick edit.
Next, let’s look at all of our different presentation options. In the lower right hand corner, you’ll see that we have our different presentation view options. Currently, we’re in thumbnail view where we get a thumbnail of exactly what each slide is designed to look like.
Next, we have our easy view, which makes it much easier to see the text that are on our slides, because as you can see, sometimes our slides are designed to look great on really large screens, but it makes it hard for us when we’re operating our slides to see what the text looks like. So switching over to easy view makes it much easier to see the text that’s on the slide. You can also access the easy view by holding the till day key on your keyboard, and this will bring you into easy view.
And when you release it, you’ll go right back to thumbnail view. And while you’re holding that till day key, you can click on slides to show them. And when you release it, you go right back to controlling it. So that’s a really simple and quick way to get to easy view. The other view option we have is our outline view.
And here you get an outline of all of your different slides and for all of our different view options, we have different settings that you can access to change right here by clicking on those three dots. And you can resize your slides using the slider here. Now, on the lower left hand side, you have our transition options. We can set our slides to be a cut, a dissolve, or an advanced specialty transition.
And so if we set this to a dissolve, we can change the timing of this. But one thing to remember is, if you’re changing these options, you’re changing this for all presentations. This is the global presentation transition. So if I change this to cut, it’s going to be a cut for every single presentation. If I change it to a dissolve, it’ll be a dissolve for every single presentation. So just be careful if you’re changing that option.
Now, our next presentation option is our slideshow option that you can see here. Now, this is typically used for announcement loops or different image slideshow. So let’s go over to this announcement loop that I have here, and you’ll see that this is highlighted with five seconds in blue saying that this has slideshow mode enabled.
And what that means is that every single slide is going to automatically advance every five seconds. And when it reaches the end of this presentation, it will automatically go right back to the beginning. You can easily adjust or remove the timer by clicking here, and you can change your times or set a custom time or set it to none if you need to remove that. Next, you’ll see our operator notes option.
Here’s where we can leave some notes for ourselves while we’re going through our presentation, or maybe the person who’s set up the presentation is leaving notes for you. So maybe when you go to a certain song, you’ll say, “Well, this is actually a really slow song, and we’re going to need to change our slides a little slower than we normally do.”
So we could just put in here slow song. And that will just be a really good reminder for us. So now every time we come back to that presentation, you’ll see we get this operator note saying slow song. So if you want to add an operator note, just click there to add that note for yourself. The next thing you’ll see is arrangements.
And just like a band has different parts to their song, like a verse and a chorus, and then they play them multiple times throughout a song, in ProPresenter, we set up our songs the exact same way. So we have verses and choruses, and you’ll see that I have one group up here for our chorus, but I’ve used it three different times in this arrangement, my default arrangement.
And I have one bridge, but I used it multiple times in this arrangement. So a couple tips for you to know as a operator is if you need to make an adjustment to a song, make an adjustment to the arrangement. Don’t delete a slide because it will delete it from every single group in your arrangement.
So if I would right click on the slide and I would say delete, it’s going to delete that from every single chorus. So now every chorus has three slides in it. Instead, what we want to do, if we wanted to maybe remove a chorus, we can go click on this arrangement button, and then we could remove this chorus by clicking the remove icon. Or if we need to add a course in, we can just drag it from the top row down to the bottom row.
So the big thing to remember is that if you adjust one section of arrangement, it’s going to adjust it everywhere else it’s being used in this song. And if we want to add or remove different sections of a song, you should do that using the arrangement, not by clicking and moving slides around. You want to use the arrangement to adjust your song. Next, we have our timeline and you might have a song that’s automated where every single slide is synced up to a click track or to a split track.
And all you need to know is to hit the rewind to beginning button and then play, and it will automatically run those slides for you. The last options we have here is for slide destination, and a transition.
Now, this transition is just for this one presentation. So if you wanted to adjust what transition was being used, just for this one song, you could adjust that here. So maybe you wanted to have this one song be a cut. Well, we can go down and switch this one presentation to be a cut. And all of our other presentations will follow this transition where this presentation will just be a cut.
So if you’re seeing something weird and you see this highlighted, you can go in and you could change this, or you could set this back to the default by clicking default in the top left hand corner, which will remove any transition that’s set there.
Now, since ProPresenter can control multiple different screens and send different versions of your content to those different screens, the preview area is really helpful to see exactly what your content looks like on all of those different screens. Now, there are two different types of screens.
You have audience screens that would be used for maybe in person content or live streaming content. And then you have stage screens that are used for people who are on stage or working behind the scenes, and you can have multiple audience or stage screens. Now, you can see all of these in the preview area.
So if we show some content here and go over to our preview area, we can see what it looks like on our main output. Now, if we click on this dropdown, you’ll see that the main output is the name of an audience screen that was created. We also have another audience screen called live stream.
And if we look at that screen, you’ll see that the text looks totally different. That’s because the text is being reformatted for that screen. We also could look at what our stage screen looks like. So I’m going to go to my stage display and you’ll see that on this screen, it looks even more different because we have our current slide text, and our next slide text being shown to everyone who’s on stage.
So you can see how your slides look very different on different screens. So one helpful thing that you can do is you can actually create an operator view. And this allows you to see multiple screens at one time. So here, we can see our main output and our live stream at the same time. So as I click through my slides, I can know exactly what the text will look like on each screen as I click through.
If you want to learn more about how to create or use an operator view like this one, you can find a tutorial in the tutorial section at propresenter.com. Now, next to the preview area, we have our clearing buttons, and this is where we can clear out all of our content or individual layers from inside ProPresenter, because ProPresenter uses layers to create the final output.
We have a video input layer, media, slides, announcements, props, messages, and our audio. We can clear out audio as well. And an easy way to visualize how these layers work and what you’re clearing when you click on those buttons is by looking at this song. So if I start up some content on this first slide, you’ll see we have media content. This motion background playing, and we have slide content on our next slide here.
And our media content continues to play, even though it’s not on this next slide, because it’s on the media layer. Now, as I click on this slide content, you’ll see that it removes the old slide and puts the new slide on. And that’s because that’s on our slide layer.
So if I click on this button, it’s going to clear out my slide content, but my media content will continue to show, or I could click the clear media button, which will clear my media content out, but leave my slide content.
So the main thing for you to know as an operator is that when you’re clicking clearing buttons, you’re clearing whole layers of content, and those layers could be used differently on different screens, so you just need to be mindful as you’re clearing content. Now, below the preview area, you’ll see the playback controls and you have playback controls for your presentations, for anything in the announcements layer, as well as any audio plane in your audio bin.
Next, let’s look at show controls, which you can find at the bottom of the right sidebar. The first thing that you’ll see is the audio bin, where you can play back different audio files or audio playlists. This could be songs before an event or a single audio clip that needs to be played. And you have options to filter through set shuffle and change the cross fade here.
Next, we have our stage controls, and this is where we can see all of our different stage screens in which layout is selected for each screen. And if you ever need to send a message to your stage screen, you can send that from the stage message area here. Next, we have our timers, which can be used for things like countdown clocks, game timers, or segment clocks.
And you can start these, stop these, and reset them all from right here. Next, we have messages, and these allow you to send dynamic alerts. So if you ever needed to send an alert about a child and the kids’ area or a car with its lights on, or any sort of real time message, this is where you would send those from. And these can all be set up in advance. So all you need to do is input the information.
So like a child number and then hit show, and it will show that number up on your screens. Then you have props, and these are often used for things like titles and lower thirds or text scrolls. And these all can be shown at the same time as your presentations. To show a prop, all you have to do is simply click on it, and that will show the prop.
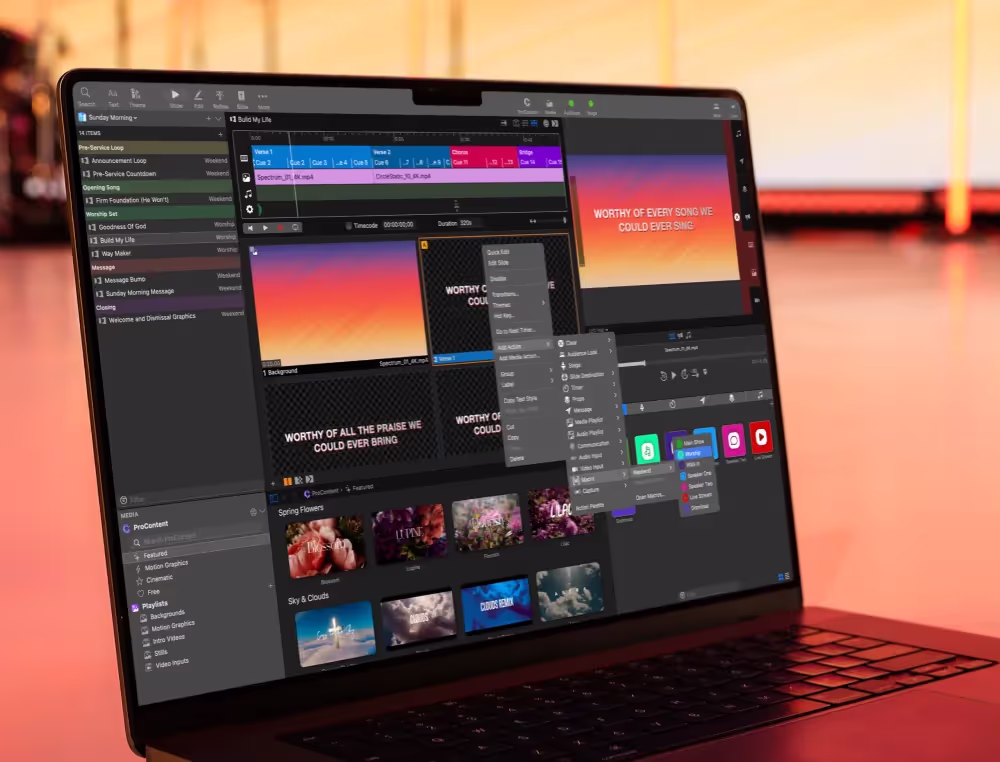
If you want to remove the prop, you can click it again, and that will remove that prop, or you could click clear props up by your preview area. Now, all of these features, plus a lot of other things can actually be added directly to a slide as an action. Now, these actions allow you to click a slide and tell ProPresenter to show the slide and do some other functions in the program.
So it’s very important to pay attention to the slides that have actions on them. Now, you can tell if a slide has an action on it by looking for the icons that are at the top left hand corner of the slide. Typically, you’ll see these on the first slide of a presentation, but you could see them on many different slides throughout your presentations.
So let’s take a look at how these actions can affect your presentations. Now, what actions look like on slides are these icons you can see here in the top left hand corner. Now, that first one, that’s a hot key, the eye icon for this intro slide, but these other white icons here, these are our actions. So this first action here is a media action, and that’s actually for the motion background that’s attached to that slide. And then the next one is Mr. Mustache here, he’s the audience look action.
And then the next one is a person at a podium, and that’s to change our stage screens. And so normally, you would want to click on this slide to trigger all those actions. Now, instead of doing that, I’m going to show you what happens when you skip over a slide with action.
So I’ll click on this slide and you’ll see that on our main output, everything looks pretty good. We’re missing our background, but everything looks pretty good. If we go to our live stream screen, you’ll see, oh, that actually looks exactly the same and that’s not what we want. And if we go to our stage display, that’s actually the same as well because it’s showing a screen preview of our stage screen. So if we go over here to our stage, you’ll see that this is set as screen preview as the different type here, different layout that we chose. So now, let’s see what happens when we select that first slide and see what everything looks like. So we’ll go back to our main output. I’m going to select that first slide.
So first off, we see that our background has been triggered, but now when we go to our next slide, you’ll see, okay, our text is there, but if we go to our live stream, you’ll see that our text is being reformatted as a lower third, and there’s no media so that we can overlay this over top of our live stream.
And then if we go to our stage display, you’ll see that our text is formatted as a current slide and next slide layout. It’s actually gone in and changed the layout that’s being used for our stage screen. So it’s done all of those different actions by clicking on that one slide. So you can see why it’s so important to click on slides that have actions.
Now, actions can do more than just control things inside ProPresenter. You can actually control things outside of ProPresenter as well, including production gear and lighting consoles. And so that first slide could have had a lighting queue on it. So if we miss that slide, we might not turn the lights on. So it’s really important to click on the slides with actions because they’re doing a lot of different things.
And even if you’re a little behind in switching presentations, make sure you click on the slides with actions before you jump ahead to anything else to make sure it’s set up for what content is coming next, and maybe even turning the lights on. Now, all of these actions can be grouped together in a macro.
And a macro can be triggered from show controls, or it can be added directly to a slide. So in show controls, you’ll see we have the macros tab here and you can see all of the different macros we have, and you’ll see how each macro has a bunch of different action icons. So this music macro is setting an audience look, a stage display, and it’s triggering a timer. We have a custom clearing one here, some lighting cues, a custom startup one.
And these macros can either be triggered by clicking on them, or we can add one directly to a slide. And you’ll see it’s this M icon, and that icon can be colored different ways. So if I drag this one on, you’ll see that the M is this different color because that macro is a different color.
So if you notice those M icons, those are triggering macros on your slides, and you might be asked to trigger a macro independently of a slide. And all you need to do is just click on the macro and you’ll see it flash. And that’s because macros are triggering a change to happen, but they’re not something that stays active necessarily.
And so you’ve triggered a clock to start, a stage display to change, and an audience look to change. And so those have all been triggered when you see that flash happen. Now, macros are so helpful because they do so many different things. So your show controls might just be macros the whole time. And if you hold command or control and then click on the macro icon, you can actually move macros over to the first position in all of your tabs.
So now, this might be the only thing that you have open while you’re controlling your show. The final thing that we’ll look at is our media bin down here. And in your media bin, you can have different playlists of media content, and you can show that media content at any time. You also have access to video inputs. And just like our slides, we can trigger this media independently and on the fly as we go.
So we might show this content here, and then we could throw this media content behind here. And then we could maybe jump to a different playlist and jump and show that media content instead. And so you can make those changes on the fly, but typically, this is set up in advance.
Now, if you want to hide the media bin, you can just click the media icon in the top menu, and that will hide the media bin. The other thing that we have in our media bin is the media transition here. So just like we had a global slide transition up here, we have a global media transition down here.
So if you want to change the fade duration between different media clips, you can do that here. You can actually type in custom numbers. So if we wanted it to be 10 seconds, instead of the default of five, you can do super long transitions and you can set these to cut, dissolve or those advanced transitions, if you wanted to as well. Now, when you minimize the media bin, it makes it a little easier to see more of your content.
And you can also minimize your library so we can hit this icon here, and it will minimize it and show you just the currently selected event, and we can switch between those. And this gives you a really clean view for you as the operator to stay focused on the current play list, instead of seeing extra content that you don’t need to see.
And when your media bin is minimized, you still have access to the transition down here at the bottom, so you can still change your slide and media transitions on the fly if you need to really quickly and easily down here. Now, we went deep into a lot of controls in ProPresenter to help you run the show, but you might feel a little overwhelmed right now by all of those options.
So let’s take a step back and look at the most important things. The first thing is that controlling ProPresenter is really easy. In show mode, whatever you click goes live. So if you select a presentation and click on a slide, it’s going to be shown. And you can use those keyboard shortcuts of the space bar or the arrow keys to control your presentations and use the up and down arrows to skip around between presentations.
So controlling is really easy. Now, the next thing is that second to last rule. If you want your audience to participate with your content, you need to make sure to switch slides before they’re supposed to say it or sing it.
We recommend switching on the second to last word or syllable. And the final one is to watch out for action. Slides can trigger many other actions that can be very important to displaying your content inside ProPresenter or controlling things outside of ProPresenter.
Now, you’ll know if this is happening if you see those action icons or that M for macro on your slides. Now, typically, these are all on the first slide of a presentation. So make sure you click on that first slide to ensure everything inside your presentation works the way it was intended to. Now, finally, I just want to say that each organization uses ProPresenter differently.
So talk to your organizational leader and see if there’s any specific things that you need to know about operating ProPresenter or features that you’ll use on a regular basis. Also, if you do a run through before your event, which you should be doing a run through before events, keep a piece of paper nearby and know any changes or mistakes or things that need to be addressed.
And then after that run through, check in with the organizational leader and make sure that you should adjust those issues. There might actually be a good reason to not make those changes.
Maybe they messed up and you had the right thing, or maybe they didn’t want you to make that change because remember all changes inside ProPresenter are saved automatically. So if you delete or edit something, it might be gone for future use. So checking in is always a good idea.
And remember, if you want to learn more about a specific feature or learn more about creating content or setting up ProPresenter in advance, you can check out all of the in-depth tutorials at propresenter.com.


Stay Updated with Our Newsletter
Get the latest news, updates, and exclusive offers delivered straight to your inbox.
Questions?
Browse our FAQs or our Knowledge base that we’ve made to answer your questions. Need additional help? Connect with a support team agent!
What’s included in a ProScoreboard subscription?
A subscription gives you access to ongoing updates ensuring your software always stays current, a ProContent starter pack customized to your teams colors to enhance your game-day visuals, editable scoring templates with ready-to-go layouts you can easily tweak, video tutorials and 7-days a week support.
How is ProScoreboard different from traditional systems?
Traditional systems are often expensive, in a fixed-location, and hard to update. ProScoreboard gives you flexibility, portability, and dynamic visuals at a fraction of the cost… all while working on hardware you already own.
Does ProScoreboard work for multiple sports?
One license, multiple sports. Switch between custom layouts in seconds, making it perfect for schools and venues that host a variety of athletic events. ProScoreboard is built for versatility; supporting football, basketball, baseball, volleyball, soccer, hockey, tennis, lacrosse, Australian football, and more. Each sport has a purpose-built layout with the correct rules and visuals, so you can create a professional experience for any game.
Can ProScoreboard integrate with existing LED or fixed-digit scoreboards?
Yes. ProScoreboard works with most scoreboard controllers. With just a serial connection and a simple dropdown setting, you can sync your visuals with existing systems- even legacy ones. We’ve done the heavy lifting so your transition is seamless.
Does it work with Scoretables or smaller setups?
Not every gym has a massive LED wall. That’s why we offer a Scoretable Edition, built specifically for tabletop displays at a lower cost. Run it solo or link it with larger displays. Available through resellers like Boostr, Formetco, and Digital Scoreboards.