
Video Transcription:
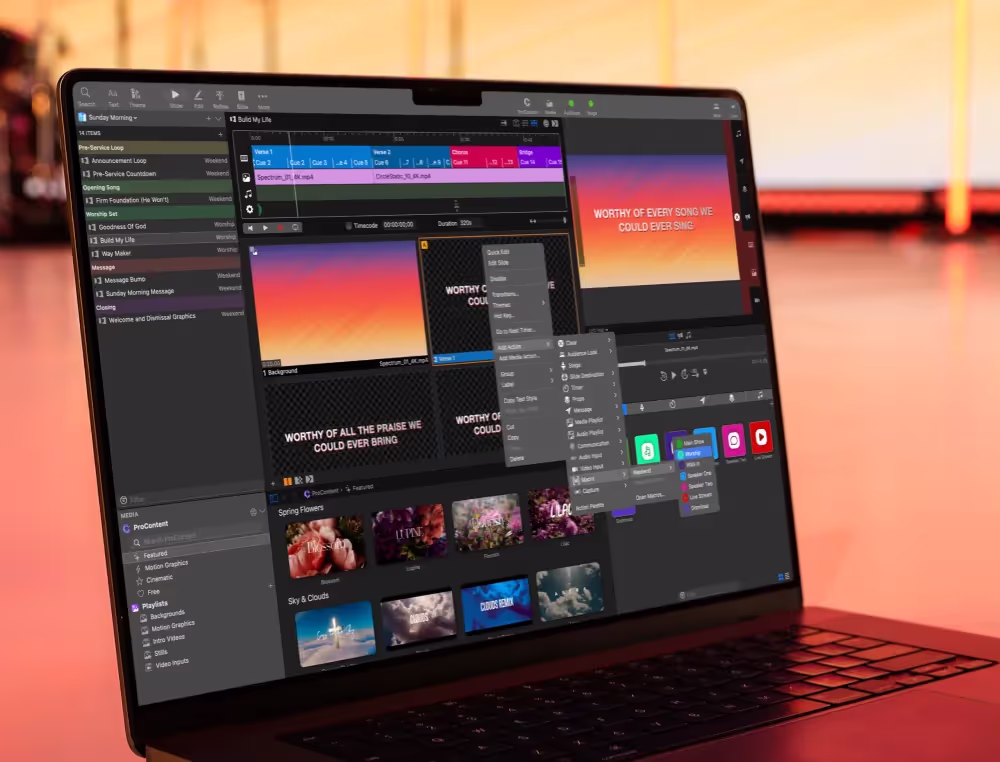
In this ProPresenter tutorial, we’re going to look at working with text across multiple different screens, like projectors and live streams and large format screens like triple wide setups. All while making sure our text looks exactly the way we want on each of those screens. Now an easy way for us to visualize how our text is being changed and transformed across multiple screens is by seeing what this slide looks like on our Stage Screen.
Now you’ll see that I created this handy Operator View over here, so we can see all of our screens at once. And if you’re interested in creating a similar view, you can check out the tutorial below. So let’s click on this slide and you’ll see that our main output, it shows exactly like our slide, but on our Stage Screen, it’s very different. On our main output, it’s in all caps and centered, but on our Stage Screen, it’s actually left-justified. It’s not in all caps and the font is much, much larger. And that’s because it’s using the raw text from this slide and bringing it over to our Stage Screen and reformatting it.
So if we go to our Stage Editor by clicking more in the toolbar and then Stage Editor, you’ll see this layout that it’s currently using. You’ll notice that it’s linking the text to the current slide’s text, but then it’s using the formatting above. So it’s setting the font Helvetica, it’s saying scale the text up or down. So it’s as large as possible inside of this container, set it to be left-justified and at the top of that container. Now, if we want to change that all we’d have to do is hit center here, and we could go back and we could see how our text is now centered instead of left-justified.
So this is a really good visual of how our text, our raw text information from this slide is being changed and transformed on our Stage Screen. But we can also do this for Audience Screens. So let’s change and transform what our live stream looks like. And the way we’re going to do this is by utilizing Themes and Looks. So first, we need to create a Theme to restyle what our text looks like. So let’s go over to Theme in the main toolbar and let’s add a new Theme. And for this example, we’re going to call this tutorial. Now we can go in here and let’s name this lower third. So we know exactly what this Theme is here. And let’s start dragging our text box down here to the bottom to set up our lower third. So we’ll move our text down. We could maybe change our font to be bold and we could set the size to be like 80, and maybe we want this to be all caps.
So we’ll set to all caps by clicking the gear icon. And maybe we want our character spacing to be a little bit more, we’ll set it to four, just because it’s in all caps and that will look a little bit nicer. And then we could add like a stroke and a drop shadow, just so our text stands out a little bit better. And then for this Theme, this is actually a lower third that we’re going to use for a chroma key. So we need to add that green background. So I’m going to go in here. I’m going to add a shape, set it to be a rectangle, and we’re going to just drag that shape up here into the top corner, drag it across our entire slide here. And then let’s go to our shape settings and under fill, let’s change our color. I’m going to switch this to be our RGB sliders.
I’m going to turn red all the way down, green all the way up, and blue all the way down. So we have this nice green background, and then I’ll pull that rectangle below our text over here in the object area. So now we have our text down at the bottom for lower thirds with a green background ready for a chroma key. So now if we go back to show, we want to utilize that Theme on our live stream. And the way we do that is through Looks. So let’s go to Screens > Edit Looks here. Here you can see our two screens and all of the different layers that are being sent to each screen. And for our Presentation Slide layer, we can choose an alternate Theme on different screens. So on our live stream screen, I’ll click on this Theme button and I’m going to go down to tutorial and I’m going to choose our lower third Theme. When I select that, you’ll see it switches it over. And now we’re getting that lower third green screen look for our text.
Now let’s take all of these concepts, link text boxes, and Themes, and Looks, and put them all together to create a custom Look like this one for a big triple wide setup, where we have three distinct screens that are working together to create one unified Look, but we have text on the left and the right side. Now, the first thing that we need to do is set up our big triple widescreen. So let’s go to screens and configure screens. And if you have an external piece of hardware that can split one giant single screen into three different pieces, you could just use a single screen. Instead, let’s use a group screen where we have one row and three columns, and then you can easily configure each piece of this screen to a different output to get that same triple wide look.
Now that we have our big triple widescreen set-up, we need to set up our slides to show text on the left and the right side of that screen. Now we could adjust the way our slides look, but it’s not great for the operator. They would have big giant thin slides here with text on the left and the right side using link text boxes, but that’s not great for the operator. So we have another option where we can use Themes and Looks. So let’s go into Theme and hit Edit. We’re going to add in a new slide to this Theme, and we’re going to name this one left right. And let’s set the size of this to be the size of our main output, our 5760 x 1080.
So the first thing we need to do is adjust how our textlooks. So let’s move this text box over to the left side. We can get thatlooking the way we want it to. Maybe we can make the font bold and change thesize to like 90. Maybe we want to left justify the text on that screen, andthen let’s rename this. So we’re going to rename this left, just so we knowwhich text box is which because we’re going to copy and paste this so that wehave our text box for the right side of the screen. So we’ll rename this oneright. And then let’s right justify this just so each text box is reallydifferent between the two of them. Now I talked about linked text boxes. And sowe’re going to actually link this text box to this one. And the way we do thatis by choosing linked text. And we’re going to choose the source of this to bea slide object called left, so that text box that we named left earlier.
So now this text box is getting its text from this one. So if I go in here and type, hello, you’ll see that it shows up in this text box, but the justification is different. And that’s because this one has different formatting. If we took bold off, this one would be not bold and this one would be bold. So you can adjust each text box to be whatever way you want, but it’s using the same text data for both of them. So now we can go back to show and now we need to assign that Theme to show on our big multi-screen. So we’ll go back to screens and do this via Looks. So we’ll click on Edit Looks, and now we can set our main output to utilize that new left right Theme. So I’m going to tutorial and to left right and selecting it for this screen.
So I’m going to save this and make sure that, that saves and goes live. And so now our main output is going to use that left right Theme and our live stream is going to use our lower third green screen Theme. So now when I click on some text here, you’ll see that our text is showing on the left and the right side of that screen. Now, the reason it’s taking this one single piece of text and showing it on both sides of the screen is because of our link text box. It’s taking the raw text data from the slide, putting it in the left text object. And then the right text object is taking the text from that one and putting it in that text object. And so that’s how we’re getting text on both sides even though this slide only has one text object, and again, we can format it differently on our live stream and our Stage Screen.
And again, this is so much easier for our operator to click on slides that look like this versus giant slides that look like this for a triple wide setup. So this is much easier to use. Now you can switch between all of these different Looks by setting up different Audience Look presets. So if we go back to Edit Looks, you’ll see that we have some different presets here on the sidebar. And if I click on them, you’ll see that on this music one, it’s using a different Theme for the live stream and it’s shutting off a bunch of layers. And on the main output, it’s not doing any format changes. And that Look is actually applied to this slide. So if I click on this and then click on some text, you’ll see that this is what it looks like. But if I would maybe go to view and go to Action Palette and we could take an Audience Look action.
So this guy here, Mr. Mustache, drop him on the Chorus here and set that to default where we have our text on the left and the right side and we have our green screen Look. Now, when I click on this Chorus slide, it’s going to change our look up and it’s going to set our text to look exactly the way we want. So we can utilize those different Audience Looks throughout our presentation. So that’s how you can utilize text across multiple screens and get it to look exactly the way you want on each screen so that you can present like a pro.


Stay Updated with Our Newsletter
Get the latest news, updates, and exclusive offers delivered straight to your inbox.
Questions?
Browse our FAQs or our Knowledge base that we’ve made to answer your questions. Need additional help? Connect with a support team agent!
What’s included in a ProScoreboard subscription?
A subscription gives you access to ongoing updates ensuring your software always stays current, a ProContent starter pack customized to your teams colors to enhance your game-day visuals, editable scoring templates with ready-to-go layouts you can easily tweak, video tutorials and 7-days a week support.
How is ProScoreboard different from traditional systems?
Traditional systems are often expensive, in a fixed-location, and hard to update. ProScoreboard gives you flexibility, portability, and dynamic visuals at a fraction of the cost… all while working on hardware you already own.
Does ProScoreboard work for multiple sports?
One license, multiple sports. Switch between custom layouts in seconds, making it perfect for schools and venues that host a variety of athletic events. ProScoreboard is built for versatility; supporting football, basketball, baseball, volleyball, soccer, hockey, tennis, lacrosse, Australian football, and more. Each sport has a purpose-built layout with the correct rules and visuals, so you can create a professional experience for any game.
Can ProScoreboard integrate with existing LED or fixed-digit scoreboards?
Yes. ProScoreboard works with most scoreboard controllers. With just a serial connection and a simple dropdown setting, you can sync your visuals with existing systems- even legacy ones. We’ve done the heavy lifting so your transition is seamless.
Does it work with Scoretables or smaller setups?
Not every gym has a massive LED wall. That’s why we offer a Scoretable Edition, built specifically for tabletop displays at a lower cost. Run it solo or link it with larger displays. Available through resellers like Boostr, Formetco, and Digital Scoreboards.