
Video Transcription:
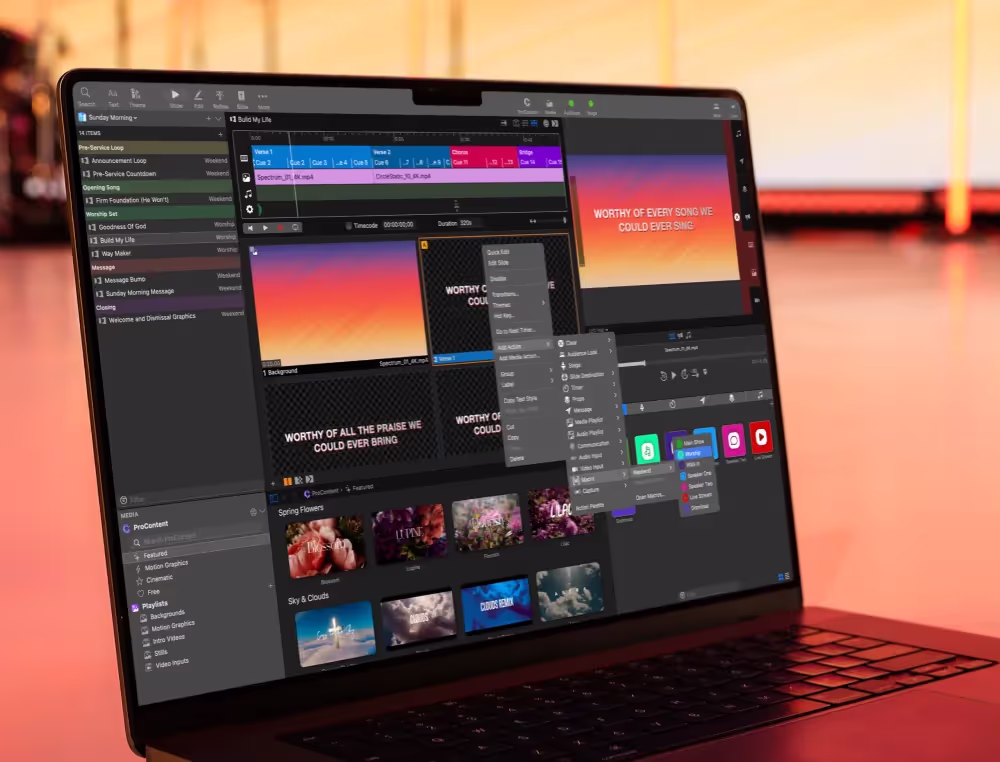
ProPresenter 7 makes it possible to not only control complex visual presentations, but also control other production gear like stage lighting without leaving the ProPresenter interface.
One widely used software based lighting program isLightkey on the Mac, that we’re going to set up in this video. Now, while I’mnot able to create a video about every app out there, I hope the basicprinciples here can help you learn how to set up ProPresenter with any lightingprogram, not just Lightkey. You can even control hardware based lightingconsoles with ProPresenter as long as that console can accept the correctcommands. So as long as ProPresenter can communicate with your gear, you cancontrol it.
First, let’s look at Lightkey and get our lightingsoftware set up. I’m going to give you a basic overview here, but you can findmore detailed information and video tutorials at the Lightkey website. I wouldencourage you to go check that out and learn more about the program after thisvideo.
Now, the first thing that we need to do is head over tothe Lightkey website and download and install the program. This free downloadcomes with 24 channels of lighting, but if you need more channels based on yoursetup and how many lighting fixtures and DMX channels you’re using, you can getan affordable, yearly license to match your need and give you more channels.
Now, the next thing that you need to do is you need toactually connect your computer to your lighting gear. If you’re coming from atraditional environment where you have a hardware based lighting console, youneed a way to hook up your computer to your lighting gear. On the Lightkeywebsite, they have a listing of all of the different interfaces that you canuse, because one of the of great things about Lightkey is they give you a lotof different options on how to connect your computer to your lighting gear.
I picked up this DMX USB Pro interface, which is really affordable and works great with Lightkey. Now, when you launch Lightkey and create a new project, it’s going to bring you to this patching window. You just need to know the DMX addresses and the types of fixtures that you’re patching in so that Lightkey can use them properly.
Now there’s a list of generic fixtures here that you canlook through, or if you know your fixture name, you can just type it in. On mydesk here, I have this 12P HEX fixture, and it starts at DMX address 80 so I’mjust going to drag and drop that in. This fixture can run in a few differentmodes, so I could select which mode, mine’s running in six channel mode, andthen we could give it a short name if we wanted to. I’m just going to type indesk here. And then we can say how many of those fixtures are there? And do wewant to patch multiple consecutively? And so you can see those would be alladded in one after each other, but we need to add in one so we’ll just hitpatch.
This is going to bring us to our main visualizer where wecan lay out our lighting fixtures just like we see them in our space. You’llsee here. I have like a back wall of some fixtures. I have some overheads, sothis is kind of over my stage. And then I have my front white lights here. SoI’m just going to take my desk light and just put it right in the middle of mystage, so that works and then we can hit done.
Now you can see we have all of our lights here and you cansee how they’re currently set. And if you look at our shot here, we have ourlight here with our blue desk light. Now I can go to my design view and I coulddim that light down a little bit so we can see it better on camera. And then wecould change up the color there. I’m just kind of scrolling through and you cansee how that color is changing of our lighting fixture.
Now that we have Lightkey configured, let’s open up ProPresenter and set up a connection between Lightkey and ProPresenter. We’re going to do this by using MIDI. Now you might be wondering what is MIDI actually? MIDI is the Musical Instrument Digital Interface, and it’s commonly used for musical instruments and audio gear, but it’s also used in a wide variety of ways throughout all of production. MIDI allows hardware, devices and software programs to send and receive MIDI notes at varying intensities across different channels.
Now don’t get overwhelmed by that. These are just ways to send data between devices and programs, and that data can be used to control them. It’s as simple as that, it’s a way to talk between different devices and programs. So, let’s add a MIDI device inside of ProPresenter.
First let’s go to ProPresenter and to preferences and let’s go to devices. Here’s where we can add in our MIDI devices by clicking this plus icon in the bottom left corner. And I’m going to add in a MIDI device. I’m going to name this MIDI device Lightkey because we can have multiple MIDI devices and I want to remember that this one is for Lightkey. I’m going to set this to auto-reconnect so once our communication is set up between Lightkey and ProPresenter, every time we restart ProPresenter it’s going to automatically reconnect.
And then the next thing is the most important. Do we wantthis to be a source or a destination? And then you’ll see a listing of all ofthe different MIDI devices that our computer can see. So you can see that wehave our computers MIDI bus, you’ll see that my audio interface has a MIDI busand you’ll see Lightkey’s MIDI bus. Now, do we want to receive MIDI from aprogram? So we want to receive MIDI information from Lightkey, or do we want tosend information to Lightkey?
We want to send it to Lightkey. So we’re going to set thedestination as Lightkey’s input. Then we can hit back and we can connect ourMIDI device. Now ProPresenter has a MIDI device that is sending information toLightkey’s input.
Now we can close this out and let’s create a new Macro for our lighting command. And the reason we’re going to use Macros is because these are a great way to set up presets that we can use over and over throughout our presentations, instead of having to remember different MIDI notes and values. You’ll see how that works here as we set this up.
Let’s add a new Macro and I’m going to call this Lights: Song 1, and now we can right click on this Macro and we can add an action. You’ll see, one of our actions we have available is a communication action and you’ll see Lightkey, which is what we named the device we created and we want to send a MIDI note on. Now we can choose what channel we’re going to send, which note we’re going to send, and at what intensity. I’m going to just set this to channel 1. And we can set this as C-2, the first note. And then the most important thing is that our intensity is more than zero. You can’t choose zero, but you can choose any intensity above it.
Just to make it easy as I’m setting these up, I’m justgoing to always choose the intensity of 1 so that I don’t have to scrollthrough the list any further. For our first communication between ProPresenterand Lightkey, we’re using channel 1, note C-2 at intensity of 1.
Now ProPresenter is sending MIDI information every time we click on that Macro to Lightkey, but Lightkey doesn’t know what to do with that information, so we need to tell Lightkey to trigger Song 1 every time it receives that MIDI note.
Let’s move the ProPresenter interface over so that we can see our Lightkey interface. I’m going to right click on Song 1 here, and you’ll see one of the options is external control, and we have an option to add a trigger. So I’m going to say add trigger. And now it’s waiting for a trigger, some sort of action that Lightkey is receiving to tell it to do something. In ProPresenter, we’re going to click on our Macro with our communication action. And when we click that, you’ll see that channel 1 C-2 showed up and now Lightkey knows what to do with that MIDI information that’s being sent. Now if I select light Song 1, it’s going to trigger Song 1 inside Lightkey. Let’s click that and you’ll see that it’s faded over and it’s changing our lights and switching that to Song 1.
Now we could add another one for our first cue, so let’sdo that. We’re going to right click on this and we’re going to say duplicate,and then let’s right click and rename this. Let’s rename this and we’re goingto just say, maybe walk in and that’s maybe walk in lighting. Now I can rightclick on this and say edit to action, MIDI note on. And I want to change theMIDI note because we can’t use the same MIDI note for everything. I’m justgoing to change the note of this to C#-2. Again, I want to make sure thatintensity is at 1. Now this note is different than this note.
Now we can do the same thing we did a second ago. I’m going to right click on cue, I’m going to say external control, add trigger, and now we can say walk in, and now that’s received C#-2. Now if I hit Lights: Walk In you’ll see that it goes back to that first cue. And if I hit Song 1, it’s going to go to that other cue.
Now, the one thing that we need to watch out for is thatall of these triggers inside Lightkey are set to toggle by default. So if weclick on this icon up here, this is our external control window. We’ll see allof our different actions. I’m going to go into our MIDI actions here, and I’mgoing to look at my Lightkey input and you’ll see all of our different actionshere. So under MIDI and our input of Lightkey, you’ll see our different actionshere.
You’ll see that we have our C-2 and our C#-2 and what it’s doing, but you’ll see the behavior is set to toggle, which could cause a problem because if we select that cue again, it’s going to turn it off. So if I hit Song 1 again, you’ll see all of the lights turned off. We don’t want it to do that. We want it to just turn on and only turn on.
Let’s fix that. We’re going to go back to this interfaceand instead of the behavior being toggle we just want it to be activate. Andwe’re going to do that for both of these. So we’ll go to this other one. We’llset that to activate. So now if you click it a bunch of times, it’s only goingto turn it on. So you can see how we can adjust those from that toggle toactivate using this external control window.
Now, I went ahead and created a few more song lighting scenes inside Lightkey, and I created a few more Macros inside ProPresenter to control them. I did it just like I showed you. Now let’s use all of those to create our playlist inside ProPresenter and see how easy it is to utilize these on a weekly basis.
Inside ProPresenter, you’ll see we have our playlist here and the first thing we need to do is add our walk-in lights to our announcement loop. Our pre-show, we have our announcement loop going, and we want our walk-in lighting, so we’ll add that lighting cue there. And then we’ll go to our first song and on our first slide with our motion background, we’re going to add in our Song 1 lighting cue. And then for Good Grace, we’ll go in and we’ll add our Song 2 lighting cue. And Way Maker, we’ll add our Song 3 lighting cue.
Now we can see this in action. When I click on myannouncement loop, you’ll see that it’s on walk in just like it currently is,but when I go to Living Hope and click on that, we’ll get our motion backgroundand our lighting changes here on stage. When I go to Good Grace, you’ll seethat our emotion background will start up here and our lighting will change toa purple color. And when we go to Way Maker, our lighting, again, will changealong with our background.
Now, if we want to make a change to this, maybe we’re using Way Maker on another week and it’s not Song 3 it’s Song 1, well, it’s really easy to change that. All we need to do is right click on this slide and we can go edit actions and we can edit our Macro and just change it from Song 3 to maybe Song 1. Now when I select this slide, it’s going to trigger our Song 1 lights. And to update our Lightkey, maybe we want to change what this looks like. I’ll select Song 1, and I’ll change this from yellow, and maybe we want to change this to teal. So I can just drag that in there and now this teal color is going to be triggered when we select Song 1.
We can always go back to our show controls and trigger anyof these lighting cues manually. We can go and click on Lights: Walk In at anytime, and it will switch our lighting over to our walk-in lights for us.
We now have ProPresenter controlling Lightkey, making itsuper easy for your operator to not only control your presentations, but alsoyour lighting. Now, this is all on the same computer. Lightkey is a verylightweight program that can easily run in the background on the same computer.But if you needed to have them on separate computers, how would you do that?Well, the next thing that we’re going to look at is how to control MIDI overyour network. And this takes a couple quick steps on two different computers,so I’m going to grab another computer that I have here, and we look at how toget this set up so that we can control Lightkey on one computer fromProPresenter on another.
The first thing that we need to do is go to search and we’re going to search our Mac for an application called Audio MIDI Setup. And when we launch that, we’ll see all of the audio devices, but we want to see all of our MIDI devices. So we’re going to go to window and we’re going to show MIDI Studio. Now this is showing all of the local MIDI devices, but we actually want to see the network MIDI devices. So we’ll go to MIDI Studio and open Network MIDI Setup.
Here we can set up different sessions to connect different computers together to send MIDI information across the network. I’m going to add a new session. I’m going to enable it. We could rename the session if we wanted to, but we don’t need to do that. The most important thing we need to do is rename this computer. I’m going to name this my Lightkey computer and then I want to make sure that this computer can see anyone and can connect to anyone, so I’ll set that to anyone. And then now on my remote ProPresenter computer, I’m going to click here and I’m going to search again for MIDI, and we’re going to go to our Audio MIDI Setup. We’re going to go to window, show MIDI Studio, and then under MIDI Studio, we’re going to open our MIDI Network Setup.
Now you can see that my Lightkey computer is showing upand now we can add a session, enable it, and then we’re going to name this oneour ProPresenter computer. And so now each computer is seeing each other and Ican now connect to this. I’m going to, again, set this to anyone, I’m going tochoose Lightkey and say connect. So now session 1 is connected to the Lightkeycomputer and on the Lightkey computer, you can see that we’re connected to theProPresenter computer.
These are both connected to each other, so now on our ProPresenter computer, we can launch ProPresenter and now we can go to ProPresenter and preferences and devices and this is where we can set up our MIDI device. So we’re going to say MIDI, just like we did before, and this is our Lightkey connection, so we’re going to call it Lightkey auto-reconnect. And here we’re going to select session 1 as our destination, and then we can go back and connect that.
Now we’re connected and now we can add in our Macro. I’m going to add in my Lights: Song 1, and I’m going to right click and add an action, communication, Lightkey, MIDI note on, just like we did before, and again, we’re going to set our intensity to 1 and we’ll use that C-2 value. If we go back to our other computer, you’ll see that when I select Song 1, nothing’s going to happen because we actually have to add a new trigger.
I’m going to right click on this, and I’m going to say external control, add trigger. And now we’re going to click on lights 1, and you’ll see that it’s received that. And if we look at our triggers for Song 1, you’ll see that we have a Lightkey trigger, that was the one from the local ProPresenter it, and now we have this network session 1 trigger, that’s from our remote ProPresenter. Now I can select Song 1 on my remote computer and it will control Lightkey on my main computer. That’s how you can connect two different computers together to send MIDI across your network.
Now, here are a couple reminders to help you avoid commonissues. First, when you add a MIDI device in ProPresenter, make sure to set itto reconnect. And in Lightkey, when you’re adding external triggers, make sureto change them from that default of toggle to activate to avoid your lightsbeing turned off if you trigger that cue more than one time. And finally onlybe super clear with your operators, make sure they know when they’re clicking aslide, now they’re not just controlling ProPresenter, they’re actuallycontrolling things outside ProPresenter, they’re changing the lights. Just bereally clear that they know that they’re triggering more than just one thingwhen they select that slide.
But now you know how to use ProPresenter to controllighting to create amazing presentations.


Stay Updated with Our Newsletter
Get the latest news, updates, and exclusive offers delivered straight to your inbox.
Questions?
Browse our FAQs or our Knowledge base that we’ve made to answer your questions. Need additional help? Connect with a support team agent!
What’s included in a ProScoreboard subscription?
A subscription gives you access to ongoing updates ensuring your software always stays current, a ProContent starter pack customized to your teams colors to enhance your game-day visuals, editable scoring templates with ready-to-go layouts you can easily tweak, video tutorials and 7-days a week support.
How is ProScoreboard different from traditional systems?
Traditional systems are often expensive, in a fixed-location, and hard to update. ProScoreboard gives you flexibility, portability, and dynamic visuals at a fraction of the cost… all while working on hardware you already own.
Does ProScoreboard work for multiple sports?
One license, multiple sports. Switch between custom layouts in seconds, making it perfect for schools and venues that host a variety of athletic events. ProScoreboard is built for versatility; supporting football, basketball, baseball, volleyball, soccer, hockey, tennis, lacrosse, Australian football, and more. Each sport has a purpose-built layout with the correct rules and visuals, so you can create a professional experience for any game.
Can ProScoreboard integrate with existing LED or fixed-digit scoreboards?
Yes. ProScoreboard works with most scoreboard controllers. With just a serial connection and a simple dropdown setting, you can sync your visuals with existing systems- even legacy ones. We’ve done the heavy lifting so your transition is seamless.
Does it work with Scoretables or smaller setups?
Not every gym has a massive LED wall. That’s why we offer a Scoretable Edition, built specifically for tabletop displays at a lower cost. Run it solo or link it with larger displays. Available through resellers like Boostr, Formetco, and Digital Scoreboards.