
34.4K subscribers
How To Create and Use Stage Screens in ProPresenter 7
Search
Info
Shopping
Tap to unmute
If playback doesn't begin shortly, try restarting your device.
You're signed out
Videos you watch may be added to the TV's watch history and influence TV recommendations. To avoid this, cancel and sign in to YouTube on your computer.
CancelConfirm
Share
Include playlist
An error occurred while retrieving sharing information. Please try again later.
Watch later
Share
Copy link
Watch on
0:00
0:00 / 5:07•Live
•
<div class="player-unavailable"><h1 class="message">An error occurred.</h1><div class="submessage"><a href="https://www.youtube.com/watch?v=g73Z0bLEkx0" target="_blank">Try watching this video on www.youtube.com</a>, or enable JavaScript if it is disabled in your browser.</div></div>
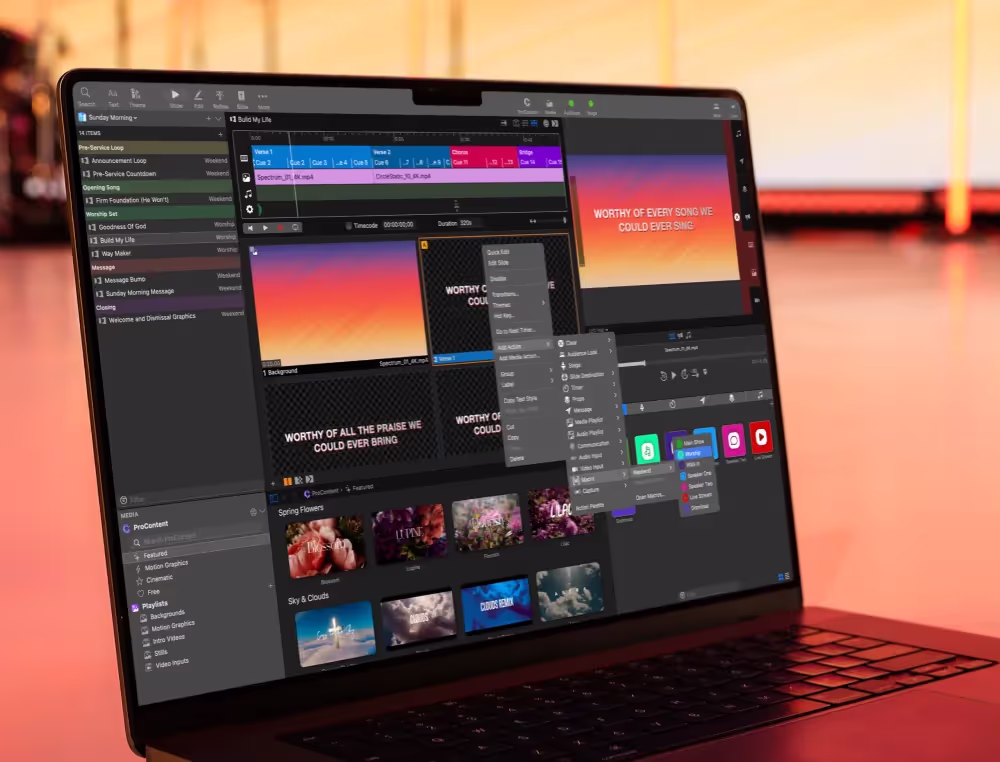
Stage Screens allow you to show relevant information about your presentation like clocks and countdown timers or what’s coming next to those onstage or working behind the scenes. Now, during the setup process, you’ll be asked to configure your screens and select an output device for your audience and Stage Screens. If you’ve not done that you can just go to screens and configure screens. Here we can add in a new Stage Screen and we can choose from any physically connected outputs or we could choose to do a new NDI output, siphon output, or a placeholder. I’m going to choose is this physically connected output for my Stage Screen. We can go up here and we can rename this and now let’s go down and add one more Stage Screen and we’re going to use a placeholder for this and let’s call this multi-view. Now that we have a couple Stage Screens set up, let’s customize what’s seen on them.
We can go to screens and edit layouts. We can also get to the Stage Editor by clicking on more from the main toolbar and choosing Stage Editor. Now, new ProPresenter 7 we have a full editor for our Stage Screens. Now, the way this works is you’ll see here we have a text box, but this text box isn’t just showing any text. It’s showing some link text and this link text is the current slide text. This other text box is formatted a little differently. It’s got a different color and its source is the next slide text. Down here we have some other text boxes that are showing clocks and timers using some different color settings. Now you don’t need to manually create these. We can easily add in pre-built Stage Screen objects. You’ll see that we have an option for our current slide, text, preview image, or notes.
We have the same available for the next slide. We can also do a live screen preview of any of our screens that we created in our screen configuration. So you’ll see our main output, Lobby, IMAG, plus our Stage Screen and multi-view. Plus we can add in course charts, Stage Messages, Planning Center Live, Timers, System Clocks, Video Countdowns, and shapes and plain text. And those shapes can be filled with images like your logo or even Live Video inputs. So let’s take a look at a custom Stage Layout that I made that’s a multi-view. Now what you’re seeing is four different shapes that have a linked fill and you’ll see that this linked fill is for the main output. We can go to our shape settings and we can see that the fill is set to screen preview and it’s set to main output. So this one’s set to our Lobby output.
This one’s set to IMAG and this one’s actually a screen preview of our main Stage Screen. And then to make it easier to know what we’re looking at, I just created some text and titles to put above each screen. Now you don’t need to create these from scratch either. We can go up to Stage Layouts and hit add and you’ll see a bunch of pre-built layouts that you can easily add to get yourself started. So now let’s assign these Stage Layouts to our different Stage Screens. So I’m going to go to screens and then down here on the stage area, you’ll see each of our two different Stage Screens and we can choose what layout is being used for each screen. So for our main Stage Screen, I’m going to choose this current next slide and then for our multi-view, I’m going to choose multi-view. So now, if we go back to our show, I’m going to go over to our preview area and I’m going to change this to multi-view.
Now, as an operator, I can see all of our different screens at the exact same time to know what content is being shown where. So if I go click on some lyrics here, you’ll see that we have a lot going on here. On our main output, we’re getting our full screen video and text and same on our Lobby screen. On IMAG we’re actually using looks to alter the look of this and using a custom green screen template. And then our Stage Screen is showing current slide and next slide and we got some clocks on there. And if I would go over to my announcement loop, which is using the new presentation layer in ProPresenter 7 and I turn that on, that’s enabled for my Lobby screen and so now you can see that my Lobby screen is showing something different than my main output.
And that’s just one way to use those new editing tools. Plus all of those Stage Layouts can be viewed on the Stage App for iOS and Android. And another way to change what layouts are being shown is by going to view and down to Action Palette and we can add in a Stage Layout queue to any slide. And so let’s say on this slide, we want to change our Stage Screen to have the multi-view and we want our multi-view to have our normal Stage Screen. Not sure why, but we could do that. And so you can change what’s going on with those layouts all with one click with actions.
Stay Updated with Our Newsletter
Get the latest news, updates, and exclusive offers delivered straight to your inbox.
Questions?
Browse our FAQs or our Knowledge base that we’ve made to answer your questions. Need additional help? Connect with a support team agent!
What’s included in a ProScoreboard subscription?
A subscription gives you access to ongoing updates ensuring your software always stays current, a ProContent starter pack customized to your teams colors to enhance your game-day visuals, editable scoring templates with ready-to-go layouts you can easily tweak, video tutorials and 7-days a week support.
How is ProScoreboard different from traditional systems?
Traditional systems are often expensive, in a fixed-location, and hard to update. ProScoreboard gives you flexibility, portability, and dynamic visuals at a fraction of the cost… all while working on hardware you already own.
Does ProScoreboard work for multiple sports?
One license, multiple sports. Switch between custom layouts in seconds, making it perfect for schools and venues that host a variety of athletic events. ProScoreboard is built for versatility; supporting football, basketball, baseball, volleyball, soccer, hockey, tennis, lacrosse, Australian football, and more. Each sport has a purpose-built layout with the correct rules and visuals, so you can create a professional experience for any game.
Can ProScoreboard integrate with existing LED or fixed-digit scoreboards?
Yes. ProScoreboard works with most scoreboard controllers. With just a serial connection and a simple dropdown setting, you can sync your visuals with existing systems- even legacy ones. We’ve done the heavy lifting so your transition is seamless.
Does it work with Scoretables or smaller setups?
Not every gym has a massive LED wall. That’s why we offer a Scoretable Edition, built specifically for tabletop displays at a lower cost. Run it solo or link it with larger displays. Available through resellers like Boostr, Formetco, and Digital Scoreboards.