
Video Transcription
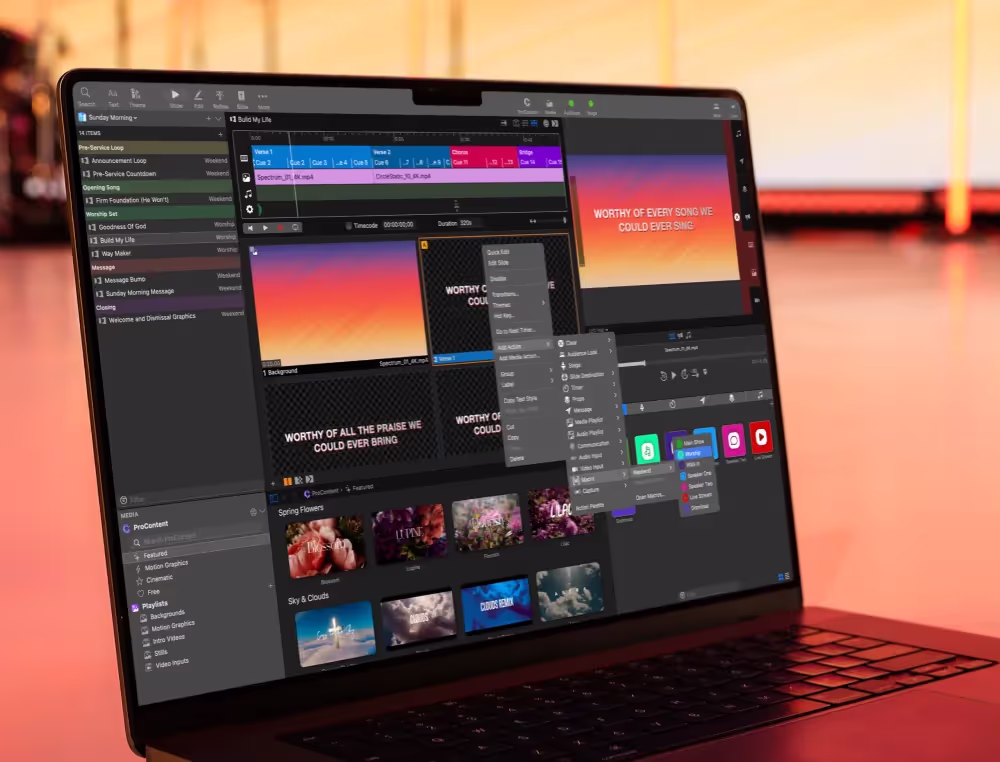
The ProPresenter interface was designed with you in mind, making it quick and easy to control the most important parts of your presentations. The main show view is set up in a logical left-to-right workflow, where we can select a presentation from any library or playlist. And then in the center, we’ll see all of the slides in that currently selected presentation.
And then we can click on some slides to show them, and we’ll see a preview on the right side. Now let’s take a closer look at all of those features and the rest of the ProPresenter interface.
Now, the first thing I mentioned was our libraries in the left panel. A library is where all of your ProPresenter presentations are saved to, and you can have multiple libraries to help better organize all of your presentations. Anytime you create or import a presentation, it will be saved to a library, so you can easily reuse those presentations in the future. Now, below your library are our playlists.
Playlists contain all of the presentations that you need for a specific event. And typically, you’d create a new playlist for every single event. Or you could reuse a playlist, if they have a similar layout, and all you need to do is add and remove some presentations week-to-week.
Now, if we want to add a presentation to a playlist, the best way to do that is using search. We could either click on search from the main toolbar, or we could hit Command+F on a Mac or Control+F on a PC to bring up our search window. Then we can search for a song presentation. And we can either click and drag that to our playlist, or we can arrow down to it, and you’ll get a preview of all of the slides that are in that presentation.
And then we can hit Command+Enter on a Mac or Control+Enter on a PC, and it will automatically add that presentation to our currently selected playlist. Now we can select that presentation, and we can scroll and see all of the slides that are in that presentation. And if we continue scrolling, we can see all of the different slides that are in every presentation that are in our playlist.
Now this center area is our slide view. And in the top right-hand corner, you can see some different presentation settings and options. And in the bottom right-hand corner, you’ll see our different slide view options. Currently, we’re viewing this in the Thumbnail View, but we also have an Outline View, and we have Easy View. Easy View makes it easier to see all of the text that’s on your slides.
The other way that you can access Easy View is from Thumbnail View. And you can just hit the tilde key on your keyboard, and it will bring you right into Easy View. And when you release the tilde key, it’ll bring you right back to Thumbnail View. Each of these view options has different settings that you can access by clicking on these three dots here, and you can see different settings for each of our views by clicking there.
In the bottom left-hand corner, you’ll see your transition options. So we can set our transition for our slides to cut, dissolve, or specialty advanced transitions, like a wipe or any of the other options that you see in the list here. Now, this transition is used for all slides in every presentation, so be careful when adjusting this, because it will affect other presentations. Now to show slides, you can click on them and you’ll see a preview on the right side in the preview area.
And since ProPresenter can send content to multiple screens, you have the ability to switch between previews of any screens you’ve configured, using this dropdown below your preview area. So we could switch to our Stage Display and preview what our content looks like on that stage screen versus our main output.
Now, next to the preview area, you’ll see your clearing buttons. And this allows you to clear out each of ProPresenter’s different layers. The layers in ProPresenter work together to create your final output. So if we click on this slide with a Media Action attached to it, and then we click on another slide with some text on it, you’ll see that we have two different layers that are currently being used, our media layer and our slide layer.
And these are highlighted letting us know that there’s content currently on them and that we can clear them out. So I could clear out our media layer independent of our slide layer. Or I could clear out both of the layers at the same time, using the clear all button here. You can also set up custom clearing groups by right-clicking on any of these clearing buttons to set up that custom clear group.
Now below the preview area, you have your playback controls for media. So this is for any media that’s playing back. And this is a tabbed interface, so you have controls for your presentation layer, your announcements layer, and any audio that’s playing in any audio playlists.
So if you don’t see your playback controls, you just need to switch to the correct tab to see the playback controls for that layer. Now below your playback controls, you have show controls. This gives you easy access to other helpful features in ProPresenter, like audio playlists, stage controls, timers and clocks, messages, props, and macros. And if you want to learn more, we have tutorials about each one of these specific features.
At the bottom of the interface, you have the media playlists, where you can organize your backgrounds and foregrounds and video inputs into different playlists. And this media layer has its own transition options that you can adjust just for the media layer, which is independent of the slide layer that we looked at earlier.
So we have a cut, dissolve, and, again, advanced transition options that we can see for just our media layer. At the top of the screen in the main toolbar, we have the search button that we looked at earlier. You can also make adjustments to formatting using text attributes or themes. And we have buttons for each of our main interface modes. The primary mode that you see right now is the show mode. And this is the one that you’ll use to control your show live during events.
Then you can click on edit, which will bring you into a full-screen slide editor, where you can design and edit your slides. Or you could click on reflow to bring you to the reflow editor. This is a powerful and easy-to-use editor that allows you to adjust all of the text on every slide, in a presentation in one easy-to-use editor.
Next, we have Bible, which will bring you to a Bible search, where you can look up scripture and show it on the fly, or save it out as a presentation, or add it to an existing presentation. And then under the more button, you’ll find other helpful editors, like the stage layout editor, the theme editor, CCLI, props, and masks.
And then on the right side of the toolbar, you can open up the media store, which is powered by Worship House Media. And you can press that media button to show and hide your personal media playlist area at the bottom of the screen that we looked at earlier.
Now, if you want to learn more about anything that I showed in this video, you can find all of our videos and in-depth training at propresenter.com.

.png)
.avif)
Stay Updated with Our Newsletter
Get the latest news, updates, and exclusive offers delivered straight to your inbox.
Questions?
Browse our FAQs or our Knowledge base that we’ve made to answer your questions. Need additional help? Connect with a support team agent!