
Video Transcription
In ProPresenter, a Macro is a combination of multiple actions. Now, an action is a way to trigger many different functions in the program, things like changing stage display layout, switching audience looks, clearing a layer, triggering a lighting command, or starting a timer.
Now, by combining multiple actions into a single Macro, you’ll be able to set up your show even faster, and you can trigger Macros without needing to click on a slide. And in this video, we’re going to learn how to create Macros and how to trigger them from Show Control, slides, or even automatically. And we’re also going to look at five great uses for Macros that you can use on a regular basis. So let’s get started by checking out Macros, which you can find inside Show Controls.
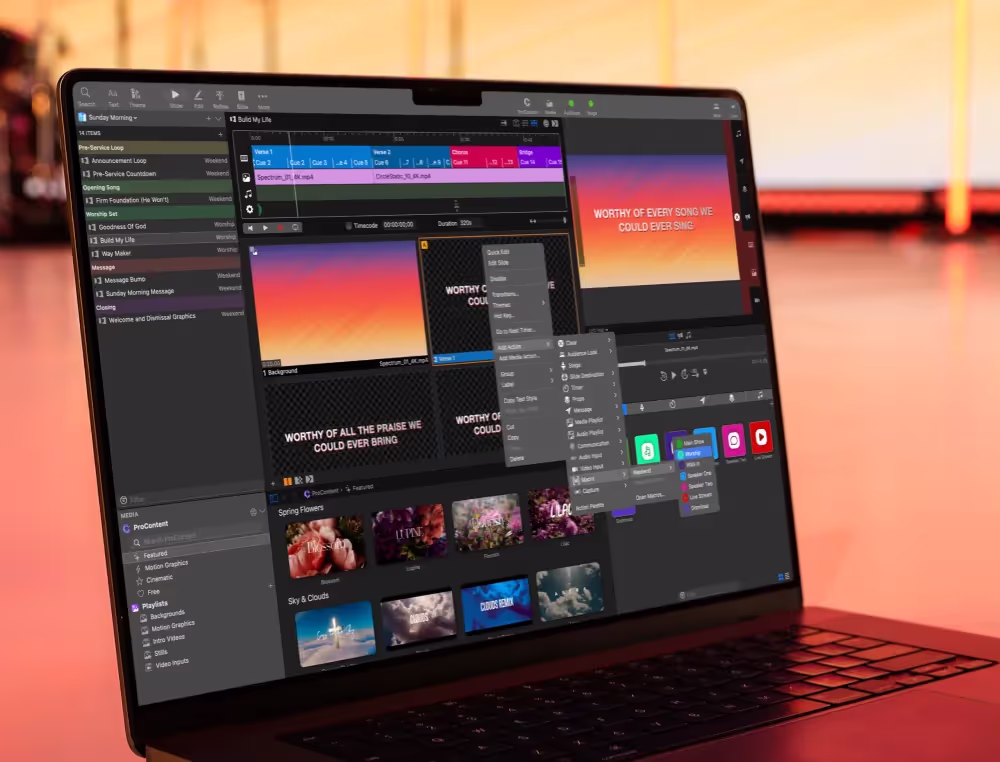
So if you look below the preview area, you’ll find Show Controls, and we can click on the M icon to bring us to the Macros tab where we can add our first Macro. I’m going to name this Music because typically when I’m creating songs, I add multiple actions to the first slide of every song to make sure my text looks exactly the way I want it to on every screen. So normally, I would right click and say Add Action, Audience Look, Music, which is a preset that I created that enables all of the layers that I want on each screen, as well as sets an alternate theme for my text on my livestream screen.
And then I would also add in a stage action so that my stage screen looks exactly the way I want it to as well. But instead of doing that, we can add those actions to a Macro so that we don’t have to remember to add those particular actions to every single song. So we can right click on this Macro and say Add Action, Audience Look, Music. And then we can right click again and say Add Action, Stage. And here we can choose our stage display layout. And so we’re going to choose this current next stacked music layout. And now all of those actions are on this Macro.
And you’ll notice that when I trigger this Macro, it highlights, signifying that it was triggered. And you’ll see that our text changed on our livestream using that alternate theme for the text. And our main output still has the text as it normally would be because that’s how my look is set up. My stage screen is also now showing that current and next slide text just the way that we wanted it to. And so we can trigger our Macros right here from the Show Controls, or we can take our Macro and add it directly to a slide.
Now, before we do that, I’m actually going to change the color of this Macro. So we can right click and we can say Change Color. And I’m going to change this to this bright yellow color. That’s because whatever color you choose for your Macro is used on your slides when you add a Macro to a slide. So we can drag and drop this Macro right on top this slide, and you’ll see that we get this nice yellow M on there, signifying that we’re using this Macro.
And we can go to our next song here and we could right click on this instead of dragging and dropping and go to Add Action and go down to Macro and choose Music. So there’s multiple ways that you can add Macros to songs. But each Macro on the slides is referencing back to this Macro. So if we make a change to this Macro, it’s going to change it everywhere a Macro is used. And that’s the beauty of Macros. So I could right click on this and say Edit Actions, Stage and we could change up our stage display layout.
So let’s change this to Presentation Info and Progress. And now when I trigger this slide that references this Macro, it’s going to change our stage display layout. So I’ll click on that. And now our stage display layout has been changed to our Presentation Info and Progress layout. And again, if we go back to this song and click on this slide, it’s going to trigger that same Macro, which again, is the same stage display layout that we had set.
Now, we could also trigger something else on this. So we could go in and we could add an action and we could add a timer. So we’re going to add a segment timer, and we’re going to say that we want this to be an elapsed timer. And now when we go and trigger a song, so we could go back to Good Grace here and click on that one, you’ll see that it’s triggered that segment timer as well as changed all of our layouts to be what we want them to be.
Next, let’s create another Macro that does some custom clearing for us because if we’re livestreaming from ProPresenter, we don’t want to accidentally turn our video input layer off. So we can make a custom clear that clears all of the layers except for our video input and audio layers.
So let’s go down to Macros and let’s add a new Macro. And we’re going to call this Custom Clear. And now we can add our actions to this Macro. So I’m going to right click and say Add Action, Clear, and we’re going to choose Media. And then right click again, Add Action, Clear, and Props; right click, Add Action, Clear Slides; right click, Add Action, Clear Messages, right click, Add Action, Clear, and Announcements. And you’ll see if we go to add any more clearing actions, the only things we’re not clearing are our video input and audio so that those can’t get turned off when we do our custom clear when we’re livestreaming.
So let’s show some text. And let’s go to our media bin and turn on our video input. And now let’s hit our custom clear and you’ll see that our video input stays, but all of the other layers got cleared, which is what we were looking for. Now, we could still hit Clear All to get rid of our video input if we want to.
Now, controlling lighting with ProPresenter is easy and powerful, but you have to remember which MIDI note or DMX value you’re sending to your lighting software. So instead, let’s use a Macro so we can easily remember and name each lighting command.
Now, for this demonstration, I’m going to show you Lightkey, but there’s other software that you can use. But in here, I have a queue list. And if I right click on this, you’ll see the external control is set to the MIDI note D sharp two. And all of these are set to the intensity of one. And for song one, the external control is C sharp two. And then for song two, the external control is D two.
So instead of having to remember those, if we go back to ProPresenter and add a new Macro, we’ll call this our Lighting Macro, and it will be Walk-In. So now it’s really obvious that this is a lighting cue for walk-in. And now we can add our communication action. So I’m going to right click, Add Action, Communication, Lightkey, MIDI note on, and we can choose that value. So we’re going to say D sharp two at an intensity of one.
Now I’m going to slide this over. And you can see currently we’re on song one, but if I trigger this command, you’ll see that we jump to Walk-In. So now we can start controlling our lighting cues.
Now I’m going to duplicate this and we’re going to say, for this one we’re going to go and rename it and we can say Song One, and then we can right click and say Edit our MIDI Note On Action. And for song one, we use C sharp two. So now I could start going through and building all of my lighting presets and give them all the same color and naming schemes so it’s easy to trigger lighting commands, as well as I could go in and I could actually drag and drop lighting commands or right on top of songs. So I could take this lighting command and add it to this first song. And that Macro is next to the other one.
Now, it’s a little hard to see that color, so we could change that up. So we could change the color of this and maybe make that white. And now we can see that that M is showing up there. So we have our first main Macro, which is our music Macro that starts up and changes our looks, starts up a timer. And then we also have another Macro for our lighting scene. And so we can add multiple Macros to one slide.
Now so far, we’ve triggered our Macros either from Show Controls or a slide, but you can also trigger them automatically.
Now, there are two different ways to automatically trigger a Macro, but first we need to create a Macro to trigger. I’m going to call this Macro Startup. And then when we right click on the Macro, you’ll see an option to trigger on startup. This means that this Macro will automatically be triggered every time ProPresenter loads, and there’s an icon to help you know which Macro is set to trigger on startup.
Now we can right click and we can add in different actions we want to happen when ProPresenter loads. I’m going to start by triggering my video input. And then let’s add another action. And we’re going to change our audience look to be our walk-in. And then we could maybe start up a countdown clock.
So I have a message here that is a countdown clock and it shows it with this theme. And we can trigger that with our Macro. So I’m going to right click and I’m going to say Add Action, Message, Countdown. And then we have an option to change up our timer for that message. So right now it’s set to a countdown timer for 10 minutes. But normally, you’d probably want to set this to count down to the time of your event. So even if you start it up really early, it will count down right to the start time of your event. For right now, I’m just going to set that to 10 minutes.
And then finally, the last thing I want to do is trigger my lighting cue. So I want to trigger my walk-in lights. And I could add in that MIDI note communication action, but instead of having to remember that, I can simply just add one Macro into another Macro. And now this Macro will also trigger this Macro.
So now all of these commands are going to be triggered when ProPresenter loads. And we can demonstrate how this works. So I’m just going to slide this over, trigger my startup command, and you’ll see our video input starts, our lighting cue switched over to walk-in, and our countdown clock is going.
Now, the other way that we can automatically trigger a Macro is through the calendar. So if I go up to View and down to Calendar, we can add in a new calendar event. And I’m just going to call this Reset because maybe we want to reset all of these settings after our event. And so our events on Sunday and we could safely reset everything at 2:00 p.m. And now the action we want to do is a Macro. And we can choose Startup. And you’ll see when we select that it adds a new icon signifying there’s a calendar event for that Macro. So those are the two different ways that you can trigger Macros automatically.
Now, here’s a few other tips about Macros. The first one has to do with our Show Controls here. If you hold Command on the Mac or Control on the PC, you can actually reorder your tabs here in Show Control. So we could move Macros over to the left side since we’re going to be using that a lot.
We can also trigger Macros with MIDI. So if we go to ProPresenter and then go down to Preferences and to Devices, you’ll see this is where I set up my Lightkey MIDI device. And maybe you have another device that’s bringing MIDI into ProPresenter. Here’s the MIDI map that tells you which MIDI notes control different features in ProPresenter. And we have an option to control Macros with MIDI note 29 or F zero. And then the intensity of that MIDI note determines which Macro we’re going to choose. So we’re going to use 29, and then intensity one does the first Macro, and two does the second, and third and fourth and so on. And so that’s how you can trigger Macros from outside ProPresenter using MIDI.
Now, the final thing that I want to talk about is what priority is used when you’re triggering Macros because when you’re using a Macro inside of a Macro or you’re using a Macro on a slide and a regular action, which one takes priority? So on this slide, I have a Macro that’s triggering this music Macro that has an action inside it for a audience look. But if I were to right click on this slide and I would add an action for an audience look and maybe change that to default, which audience look is it going to use?
On slides, it’s going to use the action that’s added over the Macro. So it’s going to choose to use this action over the Macro, which is really nice because we can add a Macro to a bunch of different songs, and then if we want to override one song, we can just add an action in just for that one song and it will override the Macro that’s being used.
So now you can see how powerful Macros are and how much easier it is to create and control your presentations. And now you know how to take full advantage of Macro so that you can present like a pro.

.png)
.avif)
Stay Updated with Our Newsletter
Get the latest news, updates, and exclusive offers delivered straight to your inbox.
Questions?
Browse our FAQs or our Knowledge base that we’ve made to answer your questions. Need additional help? Connect with a support team agent!