
Video Transcription
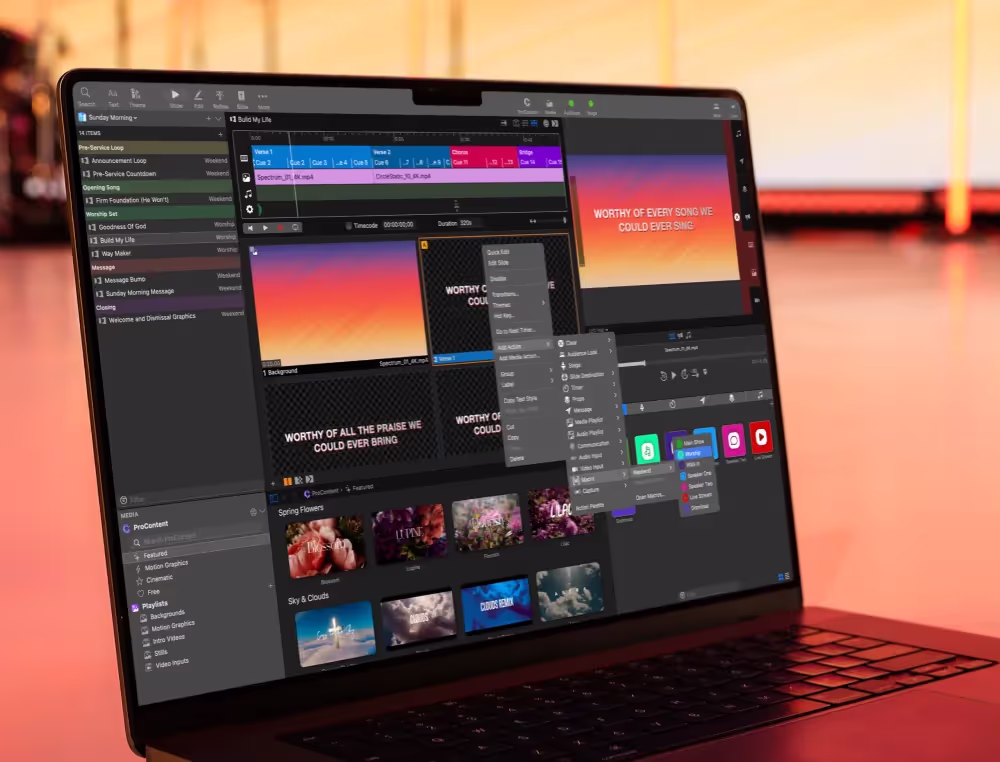
With playback markers, you can trigger actions to automatically happen during video and audio playback. Markers are quick and easy to add, and can help you know what’s happening throughout your media playback, and trigger actions at the exact moment that you want them. So let’s start looking at markers by opening up the Inspector. And the Inspector’s available for all media files and to access it, we can just right click on this video and we can go to Inspector. Here, we can adjust all sorts of different settings. We can scrub through and see what’s happening in this video.
We can also trim the video. So if we wanted to make it a little shorter, we could trim the ending by setting the in and out points of our video. We can also adjust settings like the scaling, rotation, flip it horizontal or vertically, adjust playback behavior and end behaviors. We could add a custom transition or video effects, adjust audio levels or audio routing. And for video and audio files, you can add markers.
Now, markers are very easy to add. All you need to do is put your playhead someplace in the video and click add marker, and it will add a marker. Now I want to add a marker at the beginning of our video.
So I’m going to jump to the beginning and say, add marker. This is going to add a marker at the beginning of our video, and you can see that marker right here. Now we can add an action to our marker. So I’m going to right click and say, add action. And the first action I want to add is a MIDI communication action to change my lighting. And so this is going to communicate to Lightkey. So we can go to communication, Lightkey, and add a MIDI note. But instead of remembering those MIDI notes, I’ve already added one to a macro and I’ve called it lights off. So we’re just going to add this macro here that will turn our lights off. So when our video starts, our lighting automatically gets turned off every single time you trigger that video file.
The other thing I want to do is add a large clock to my stage screen, to show everyone on stage how much time is left in the video. So I’m going to again, right click, and I’m going to add an action of stage, and then we’re going to go and change this to video countdown. So now these two actions are going to be triggered when our video starts.
So let’s see this in action. So I’m going to just slide ProPresenter over so we can see Lightkey and ProPresenter at the same time. And now let’s click on this video file and you’ll see our lighting has changed to video and all of our lights have faded out. And if we switch over to our stage screen, we’ll see this large clock showing us how much time is left in our video. And we could switch back to our projector and see exactly what’s on there.
But let’s pause this a second and take a look at all of what we have available in our transport controls when it comes to markers. The first thing that you’ll notice is that you actually see your markers right here in the playback controls. And so we can right click on this marker and we can actually adjust it. We can add actions to it. We can can edit actions or remove them. We can add a name, change the color of that marker or move that marker to wherever the playhead currently is at. We can also go to this marker button and click on this, and it will show us all of the markers that have been added to this media file. And if you click on a timestamp, it will jump the playhead to that marker.
Now often in announcement videos, intros, or bumpers, you’ll see a long ending or a tail after the main part of the video is over with a graphic or audio that’s slowly fading out to be used as a transition to the next part of the show. But this can cause an issue. Our video file could be 2 minutes long, but contain a 30 second tail. So if you’re watching a video countdown timer to know when the next person should start going on stage, you’re going to be looking at the wrong time. It’s going to be 30 seconds off, but we can use markers to actually solve this problem.
So the first thing we need to do is add a marker right when our video actually ends and our tail begins. And so we can just scrub through our video here and find where that moment is. So it’s right about in here. And so we can right click and say, add marker. We don’t need to go back to our video Inspector.
We can add a marker right here in our main interface, and I’m going to right click on this and I’m going to add a name and we’re just going to name this end. And now we can utilize this end marker to countdown to instead of the end of our video file. So the way we’re going to do that is by going to more in the main toolbar and going to our stage editor. Here’s the layout that I used earlier. And the way I created this was I just added a video countdown object to this slide. So we’re going to actually delete that video countdown.
Instead, we want to add a playback marker. And what we want to do is we want to go to the last playback marker. We want to count down to the last playback marker. And so this is adding a text box that’s got a clock that counts down to the last playback marker. We can adjust our scaling to scale that text up to make it nice and big, adjust our clock so it doesn’t show hours or milliseconds.
And also there’s an option here that adjusts the color of the text to be the color of our marker, which sometimes can be helpful. But for this clock, I just want it to be white. So I’m going to deselect that. So now we have a text box that’s going to show a clock that will count down to our last marker.
So let’s go back to our show and see what this looks like. So I’m going to show us our stage screen so we can see our clock here. And before, we were counting down 1:58 or so. Now when we click on this, you’ll see it’s about 1:42, because it’s counting down to that marker. And so as we get closer three, two, one, zero, and right there, it’s going to hit the marker and it’s actually going to start counting up. So it’s counting down just the way we want it to. But when we hit the marker, we actually are starting a whole new thing.
So let’s change our stage layout. Instead of seeing this count up, let’s go to a helpful stage layout for our people on stage. So I’m going to right click and I’m going to say, add action. We’re going to go to stage and let’s change our stage layout to be our current slide plus large notes.
The other thing that I want to add to this is a timer. So I’m going to right click again, I’m going to add an action and we’re going to go down to our timers and I’m going to add a segment clock. And so this is going to add in a lapse timer to let our people know on stage how long they’ve been on stage.
And then the final thing I want to do is I want to turn the lights back on. So we’re going to right click and we’re going to add an action. And again, I created a macro earlier with a communication, a MIDI communication command, and we’re going to use this lights host one, that’s got that MIDI communication command added to it. So now let’s move our interface over here and see how all of this works.
So I’m going to start that video. It’s plain, we’ll get close to this marker. And at zero, it’s going to change layouts, it’s going to turn our lights on. And it started that elapsed timer to let our people know on stage how long they’ve been on stage. And I can pause this and our timer’s going to keep going because that elapsed timer is running, letting them know how long they have been on stage.
Now let’s add in one more marker to make it even more clear of when they should come on stage. So I’m going to just add a marker maybe right about here, and we’re going to add a marker and then we’re going to rename this marker, enter stage now. And so this is a command to tell our people, this is when we want you to walk on stage. So now let’s utilize that on our stage layout. So we’re going to go to more in stage editor, and on our countdown clock, we’re going to add another text box, another playback marker. And we’re going to add one for previous.
So it’s going to show the previous marker. And instead of it showing the time to marker, we’re going to say marker name. So we’re going to show whatever the playback marker’s name is, whatever the previous playback marker’s name is. We’re going to scale this text up so it’s a little larger and easier to see. And now let’s go back to our show and let’s see how all of this works.
So we’ll click on this clock. It’s going to start showing it. And then right here, we’re going to get to this marker. And then all of a sudden, it’s going to say, enter stage now. And then when it gets to our final marker, again, it’s going to adjust our lights, our stage screen, and start that elapsed timer for us. So all of that’s happening. So we’ve got a lot of automation going on that’s happening through all of these different markers.
Finally, since we know we have somebody walking up after this video, we could add one final action during the video tail to automatically show a prop with their title. So first let’s start by creating a quick title prop. So I’m going to go to props in our show controls, add a new prop. I’m just going to name this title for now. And then we can right click and say, edit. And we are going to add in maybe a little shape, a little rectangle to be like a little bar for us down here in the corner. And then we could add our text box, and we can scale this down a little bit, and align that over here, we can change our font size to be 80, change our alignment to be left justified. And then we could type in our name of Jane Smith for our next person. And now we can go back to show.
So we have our title here. And currently our looks are setting that props only show up on our ATEM, on video switcher and not on our projector. So when they’re shown, that’s where they’re going to be shown at. And now we want to trigger that to be shown near the end of our video here. So I’m just going to right click and I’m going to add a marker and then we can add our prop to that marker so I’ll right click on the marker, add an action. And we’re going to go to props and add our title marker. Now we are going to run into a problem.
Earlier, we created a countdown clock that counted down to our last marker. Now our last marker is right here instead of being right here. So how can we fix that so our countdown clock still counts down to this marker? So let’s see how we can fix that before we see how our prop works. So let’s go to more in our main toolbar, go back to our stage editor, and then we can click on this text box that’s currently going to the playback marker last. And we have another option in here. We have first and previous, next, last, but we also have match by name. And we named that marker end. And so now we can count down to the end marker.
So now when we go back to show, and we click on this video file, let’s see how this all works. So it’s playing back. Let’s go look at our stage screen and we have our countdown. And when we get to this marker, it’s going to show us enter stage now. When we get to this marker, it’s going to change our layout, start a clock. And when we get to this marker, it’s going to trigger our prop. And so if we go to our projector, it’s still showing that. And on our ATEM, we have our prop being shown.
Not only are playback markers powerful and easy to set up, but you can see how they can help your operator focus on the main thing, like showing a video, instead of remembering all of these little extra details. Now you can find even more training and tutorials at propresenter.com.

Stay Updated with Our Newsletter
Get the latest news, updates, and exclusive offers delivered straight to your inbox.
Questions?
Browse our FAQs or our Knowledge base that we’ve made to answer your questions. Need additional help? Connect with a support team agent!
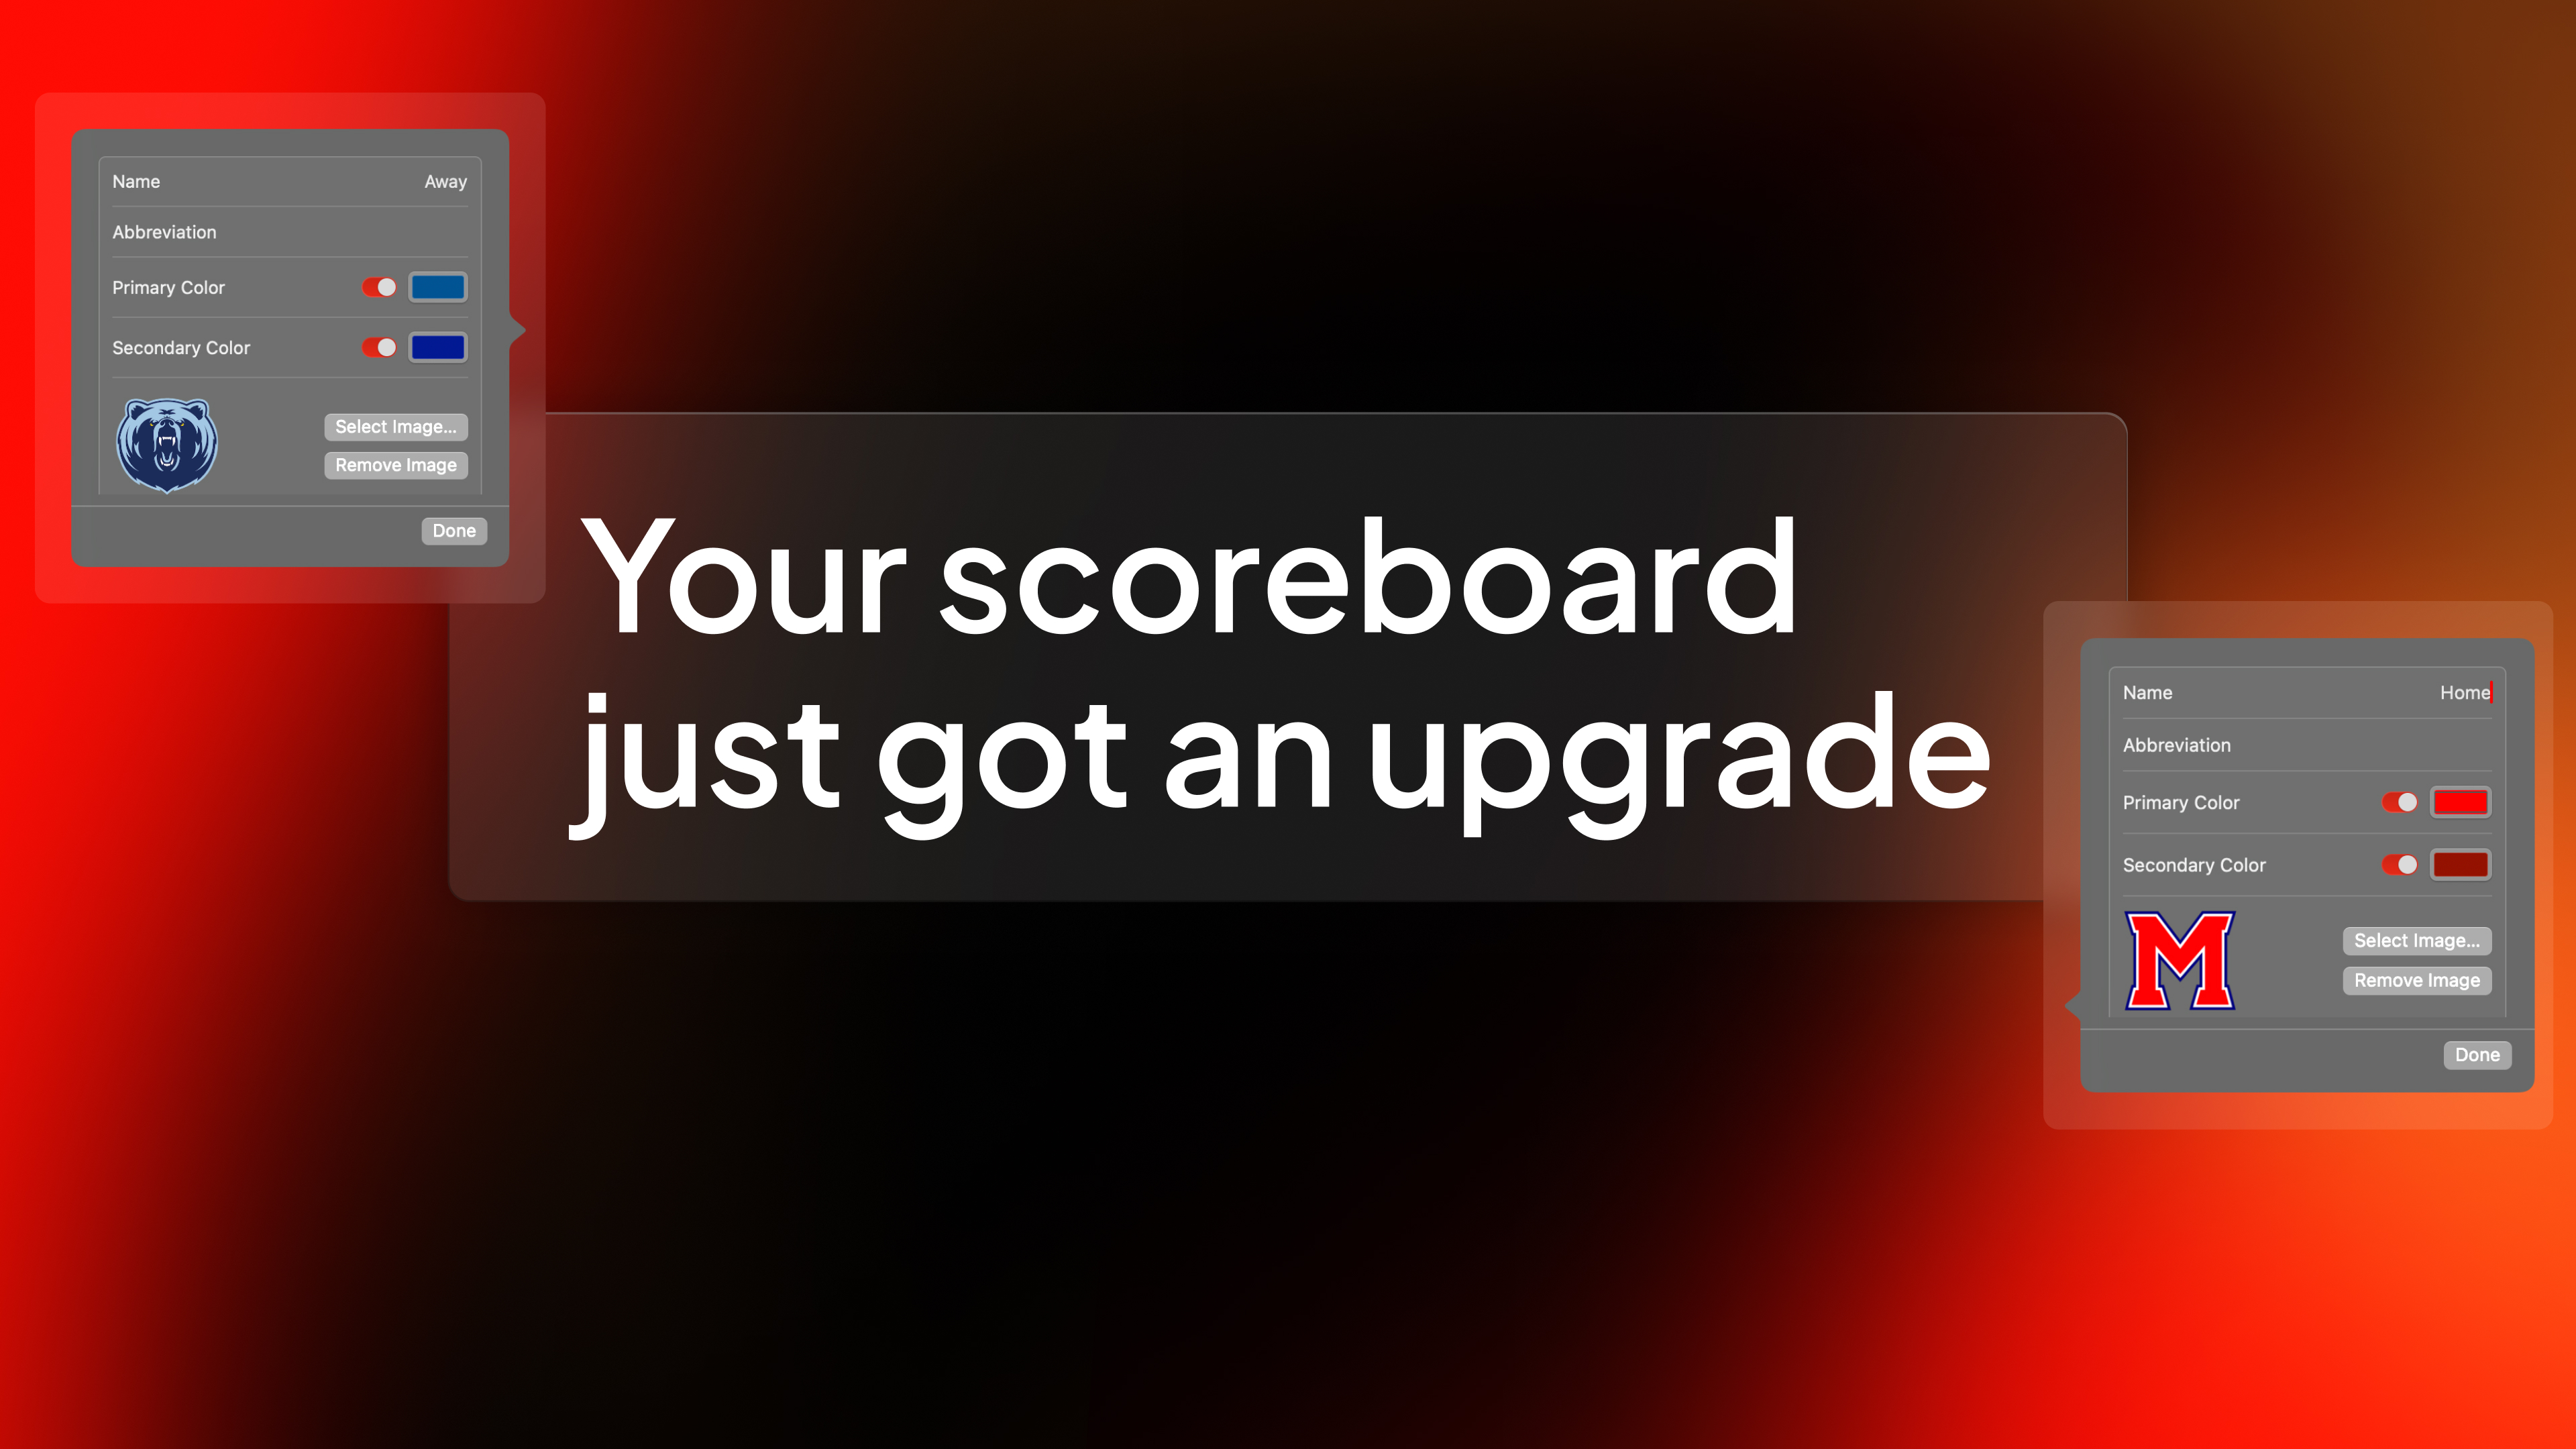
What’s included in a ProScoreboard subscription?
A subscription gives you access to ongoing updates ensuring your software always stays current, a ProContent starter pack customized to your teams colors to enhance your game-day visuals, editable scoring templates with ready-to-go layouts you can easily tweak, video tutorials and 7-days a week support.
How is ProScoreboard different from traditional systems?
Traditional systems are often expensive, in a fixed-location, and hard to update. ProScoreboard gives you flexibility, portability, and dynamic visuals at a fraction of the cost… all while working on hardware you already own.
Does ProScoreboard work for multiple sports?
One license, multiple sports. Switch between custom layouts in seconds, making it perfect for schools and venues that host a variety of athletic events. ProScoreboard is built for versatility; supporting football, basketball, baseball, volleyball, soccer, hockey, tennis, lacrosse, Australian football, and more. Each sport has a purpose-built layout with the correct rules and visuals, so you can create a professional experience for any game.
Can ProScoreboard integrate with existing LED or fixed-digit scoreboards?
Yes. ProScoreboard works with most scoreboard controllers. With just a serial connection and a simple dropdown setting, you can sync your visuals with existing systems- even legacy ones. We’ve done the heavy lifting so your transition is seamless.
Does it work with Scoretables or smaller setups?
Not every gym has a massive LED wall. That’s why we offer a Scoretable Edition, built specifically for tabletop displays at a lower cost. Run it solo or link it with larger displays. Available through resellers like Boostr, Formetco, and Digital Scoreboards.