
Video Transcription:
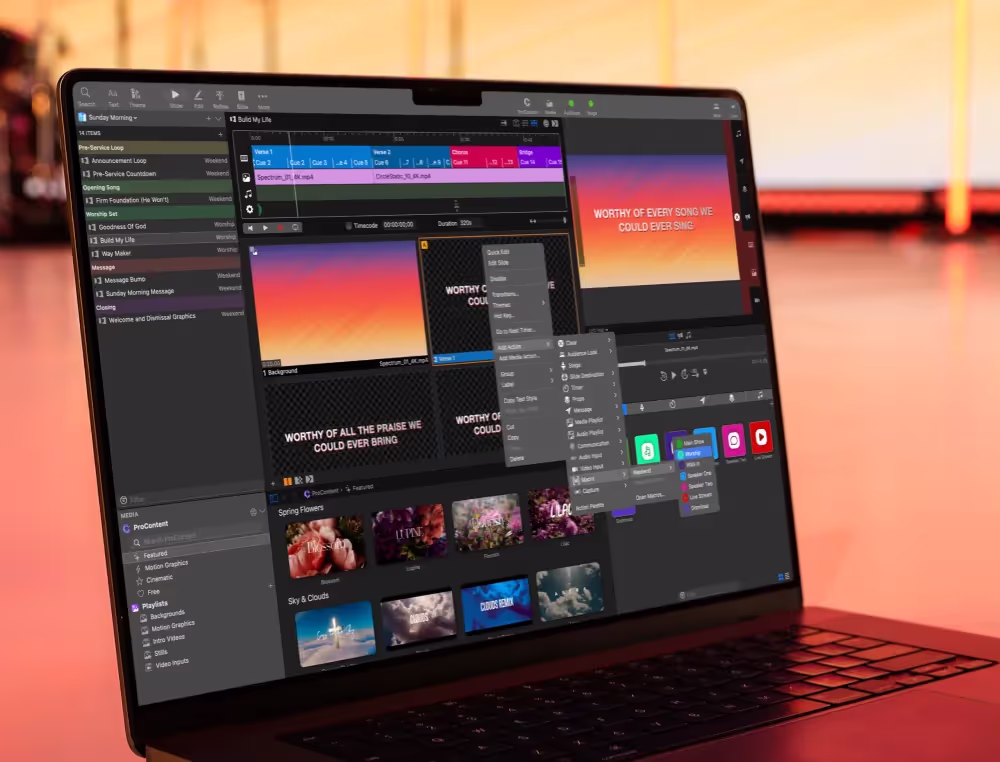
With the ProPresenter Timeline, you can synchronize your slides, media, and actions to a soundtrack for perfect playback of your presentations. Now your slides can always be in sync with your musicians, complex presentations can be created ahead of time, and operators can start these presentations with just one click and then let ProPresenter do the rest of the work. If you don’t have an operator, you can remotely start and control your timelines.
So, let’s dive in. Now any presentation inside ProPresenter can be recorded and automated using the Timeline, and you can access the Timeline by going to the upper right-hand corner of any presentation and clicking on the Timeline button. Here you can see a timeline that I’ve previously created, and you can see all of the slides that have been recorded, any media changes, audio files, and actions.
So, you can see how it’s really easy to navigate this. We can jump around because all of our groups and color coding is shown right here in the slidetrack of our timeline. Then in the media track, you can see any motion backgrounds that are being triggered and when they’re changing, and these are independent of each other.
Same with our audio files and our actions. So I have a single audio file, which is a click track .wav file that I created for this song, and then we have one action in this action track, and this is actually a music macro that’s just changing my Audience Look and my Stage Screen, but you can add in even more actions.
Then to play back a timeline, all you need to do is take our playhead, which is right here right now, and we can just rewind to the beginning and hit Play. This will start playing our timeline, and you’ll see our audio file is playing, our background started, our action of our stage and audience screens were triggered, and now it’s going to start triggering through all of our slides.
I’m just going to jump ahead here to the verse, and you can see how our slides are changing exactly when we want them to every single time. You can also control the timeline externally using SMPTE time code by selecting this box here.
So now, let’s look at how we actually record our timeline. We’re going to start from scratch in another presentation, so I’m going to go to Promises. We’re going to go to the upper right-hand corner, and we’re going to show our timeline. The first thing that I like to do is add in an audio file so that when I’m recording my slides and media and actions, I’m doing that to a soundtrack.
So we can either right-click in our audio track and add an audio track, or we could go to an audio playlist and drag and drop an audio file right into the timeline. I’m going to move this to the beginning, and then you’ll notice that our audio file is actually longer than our timeline, so we need to extend our timeline. We can either manually type it in here, or we can just easily drag this to the end.
So now, we’re ready to start recording. We have our audio file ready, and we can start recording. So we can enable Record, and now with the recording enabled, any slides or media or any of our actions that we click on will be recorded to this timeline whether we’re playing or not. So if I click on this media file, it’s going to be recorded to the timeline right where the playhead is. If I would move the playhead later in the song and click on a different media file, now that’s been added there.
So now, I have my media files added in, but the way that you’ll normally use this is by playing it back, so I’m going to rewind the timeline and hit Play. Now we can start clicking through on our slides. I’m not going to do this perfect, so I’m just going to kind of click on these a lot faster than I normally would.
Let’s say we got our intro, now we’re going to go to our verse, and we’ll have our first slide, and then we’ll click on our next one, and then maybe we’ll jump down to the pre-chorus just so we can see some other content in there, another pre-chorus cue. Then let’s jump to the chorus, and we’re doing another one for the chorus. Whenever we’re ready to be done, we can just hit Stop right here by our timeline.
So now, we’ve gone through and we’ve recorded different slide playbacks. We’ve already added in some media to the media track, and we could go in and we could start adding in some actions.
So if we wanted to, we could go over to our macros and we’ll grab this music macro. We can just drag and drop this right into the timeline. I want this to be right at the beginning of the song so it changes my Audience Look and Stage Screen for me to make sure everything looks right on all my screens, so I’ll add that in there.
Maybe right here at the chorus, we want a lighting command, so I have a MIDI communication command added to this macro, and I’m going to add that to the timeline, so that’s added there.
We can also go through and start editing. So maybe we made a mistake, and the chorus needs to be a little bit later.
Well, we can move these around so that second chorus cue we can move there and maybe the first one is right here. We can start making adjustments, or if we messed up and we just need to do it again, we can just delete these and say, “Okay, we want to start right here. I’m going to hit Play, and now I’m going to go through and get these in there right at the right time.”
We can go through and rerecord whenever we want, so you can easily just click and delete items that were mistakes, or you can move things around to adjust them.
You can also edit these so we can right-click and make changes to the properties of those media files or to our audio files. You can change your actions. We can add more actions to them or adjust what the action is doing. So you can adjust all of those there, and we can drag, select, and delete them if we wanted to.
If we need to add an action back in, we can easily just right-click, say Add Action, go back to our macro and say Music, and now that’s been added back in. There’re multiple ways to add items. You can either have Record enabled and click on something, you can right-click, or you can drag and drop. There’s a lot of different ways that you can add them in.
Now, when you’re done recording, the most important thing to do is to disable Record because you don’t want to continue to add these slides to the timeline. When recording is enabled, any slides or media or actions automatically get added to your timeline. Now that we’re done recording, we can click on stuff, but you’ll see that these are not being added to our timeline. These aren’t being added in.
Now, we can go and we can play our timeline back, and it will play back exactly the way we wanted it to. So for your operator or volunteer, all they need to know is how to rewind the playhead to the beginning to start at the beginning, and then hit Play. They can play the song, and it will play exactly the way it’s supposed to. The slides are going to trigger when they’re supposed to, and it’s going to jump to all the different items.
Maybe you’re in rehearsal, and you want to jump to a certain part of a song and like, “Hey, let’s hit that chorus.” You can scrub right before the chorus and hit Play, and it will jump right to where you wanted it to be.
Now, not only can you stop your timeline using the Play and Stop button here, you can also stop your timeline using your clear group here. So if I right-click on this Clear button, I can configure this clear group. Under the Presentation and Announcements, you’ll see an option for Stop Timeline, which is enabled by default.
When you click on a clear group that has the presentation or announcements layer enabled for it, it’s going to stop the timeline. So if you want to give your operators the flexibility to clear things without stopping the timeline, make sure to disable this option.
Now, you can also control the timeline remotely using the ProPresenter Remote app for your phone or tablet, the official Stream Deck app, or third-party integrations like Companion. This gives you control of your fully automated presentations without needing to be in front of your ProPresenter computer.
So, let’s take a look at how you can start and run your timeline from your device. Now you can download the official ProPresenter app from the Google Play Store or the Apple App Store. I’m going to demonstrate this using my iPhone, but you could use an Android or a tablet.
Once you’re logged in, I’m under Playlists and I’m going to click on the playlist that we are currently in. Then I’m going to click on Promises, which is the presentation we are working on, and at the bottom, you’ll see Timeline Controls.
So you can see that it’s going to rewind back to the beginning when I hit the Rewind to Beginning button. Then when I hit Play on my phone, it’s going to play it inside of ProPresenter, and the timeline just starts.
This is awesome, and it’s perfect for musicians. They can now control their tracks and run slides right from the stage. They can even stop their tracks from the device as well. So whether you’re a musician on stage or you’re running sound or you’re just away from the booth, this is a great way to control your timeline when you are not right in front of the computer, and it’s really easy to use.
So, that’s how you can use the ProPresenter Timeline to automate all of your slides, media, actions, and audio playback perfectly every single time as you present like a pro.

.png)
.avif)
Stay Updated with Our Newsletter
Get the latest news, updates, and exclusive offers delivered straight to your inbox.
Questions?
Browse our FAQs or our Knowledge base that we’ve made to answer your questions. Need additional help? Connect with a support team agent!