
Video Transcription:
In this video, we’re gonna talk about audio inputs and routing, which is a part of the brand new audio engine inside of ProPresenter. That not only allows you to bring audio in for things like your live stream and recordings, but allows you to send audio out to different devices like NDI, SDI, and your main output. Plus, we’re gonna give you three common use cases for these new audio features to get you up and running quickly.
But first we need to talk about how audio is routed and processed inside a pro presenter. So the new audio engine can process up to 16 channels or buses of audio. Now, what this means is that we can take audio inputs from devices like this focus, right device and audio console, maybe the microphone on your computer or video files or audio files playing inside a pro presenter and route them to any of those 16 different channels.
And those 16 channels then can be sent out to any of your outputs and you can send any, or all of your audio channels to each of your different output devices. And those output devices include things like your livestream, audio, your recording, audio SDI, and NDI, or your main output, which could be a device like this one. So this gives you incredible flexibility on how you mix and row audio inside a pro presenter to send to all of your different outputs.
So now let’s go inside pro presenter to see how to set it up.
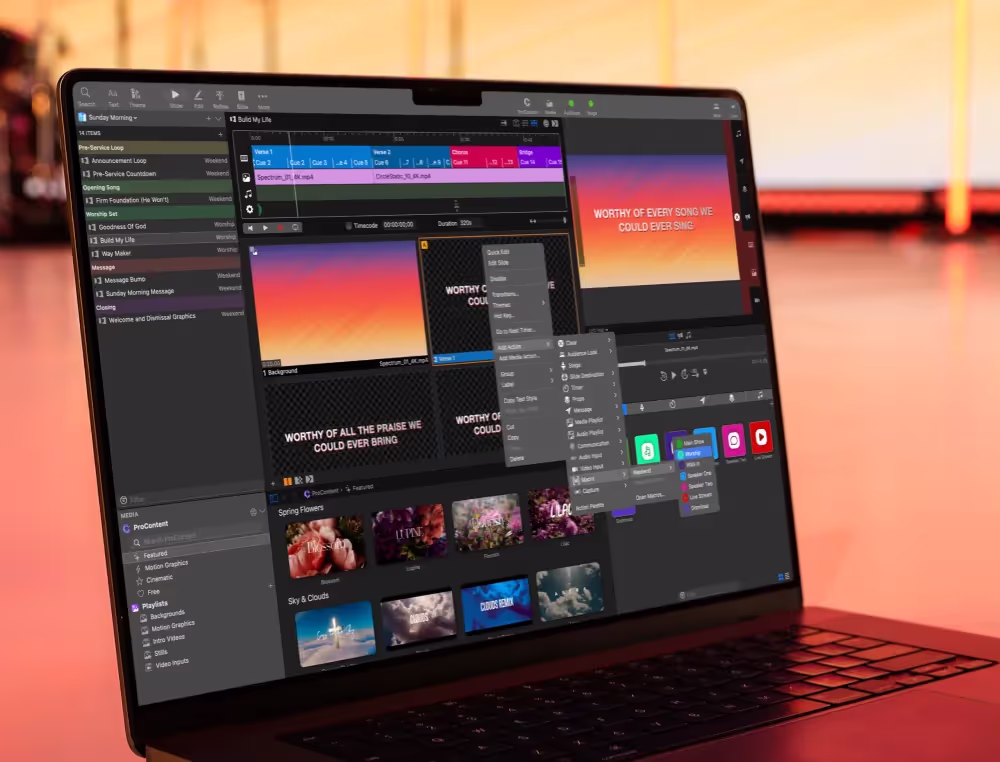
First, let’s go to pro presenter and then two preferences on the audio tab. You’ll see we have a channel count and this is where we set. How many pro presenter audio channels we want to process by default, this is set to two, but like I mentioned before, you can have up to 16 for this video.
I’m gonna set this to eight. That way we have flexibility and control. As we start adding more audio input devices and routing our audio to different output devices. And as we change our channel count, you’ll see that we get more audio meters in our preview area.
Now these audio meters are monitoring the audio in our pro presenter audio channels, not the audio that’s playing back on our main output device. Like in previous versions. I mentioned this because if we would change the routing for our main output device and say that any audio playing back to pro presenters channels one and two go to our devices one and two and our devices three and four. And then we would click on an audio file.
You’ll notice that our meters are only showing audio playing back on channels one and two that’s again, because this is only showing what’s playing back to pro presenters audio channels, not our main output devices, audio channels.
Now that we have our global audio channel set and we can see and understand how our audio is metering. We can go to the input tab in our preferences, and you’ll see that this input tab is no longer just for video, but we can add our audio inputs.
So I’m gonna add a new audio input here, and I’m gonna select my source of my Scarlet two I four, and then I can go and rename this device. And then you’ll see some modes we have currently this device is set to off and we wouldn’t actually be able to use any of the audio coming in. So we need to set this to on, to utilize the device.
We also have modes of auto off and auto on that. We’ll talk about more as we go through our examples. Now below our source settings, we have a delay option in case we need to get our audio in sync with a video input and we have a master volume, and then you’ll see our routing options for this audio device.
This is where we’ll set, where our audio inputs are being routed to in our pro presenter audio channels. And we can set how much of each of these audio inputs is being sent to those channels by changing the volume for each individual channel here.
Now let’s look at some common ways that you’ll use audio inputs and routing in your workflow. And the first one is when you want to send audio out of pro presenters main audio output to an audio console, just like you normally would. You’re sending audio from video files and audio playback in pro presenter to your console, but you also want to receive audio into pro presenter to use for your live stream.
So this might be a two channel broadcast mix that you’re gonna use for your live stream. And this is where we could run into an issue because our two channel broadcast mix contains audio.
We sent out of pro presenter, and now we’re receiving it back into pro presenter, and you can see how you could create a feedback loop of audio out of pro presenter, and then back in and then out and in. And that’s how you create those feedback loops.
Or you could have doubled audio because you’re receiving audio in and playing audio back at the same time and they’re slightly outta sync. And so now you have this weird doubled audio that’s really loud. And none of that is very helpful.
So one of the ways that we can handle this is by using audio routing inside a proper center. So we could use four of, uh, pro presenters audio channels, and we could use the first two audio channels to send audio out of pro presenter. So all of our normal video files and audio files, they’d go out the first two pro presenter audio channels.
And we’d send that out, our main output. And then we could use channels three and four for our audio input. That way they’re separated and they’re never gonna cause a feedback loop. So let’s look at how we would do this first. Let’s look at the routing options for our input device here. So we’re gonna click on routing and you’ll see we have two, two channels of audio that are coming in from our input device. And they’re being sent to pro presenters first two audio channels.
But this is where we would run into feedback loop issues, because any typical videos or audio that you’re gonna play back from pro presenter are gonna play through pro presenters. First two audio channels, basically your left and right channels. So we don’t wanna bring audio back into those first two channels. Instead, we want to move our input, audio to channels that we aren’t currently using.
So we’re not using channels three and four. So I’ll just move our audio input over two channels, three and four. So now any audio that’s coming in is coming into three and four. And if we go back to our audio device settings for our main output device, you can see that pro presenters channels one and two are being sent out of our device channels one and two.
And to ensure we don’t run into any feedback loop issues, let’s just turn off pro presenters channels three and four, where our input device is coming in so that it can’t go back out our output device, creating that feedback loop. Now, even though we turn those off for our main output device, we can still use pro presenters channels three and four for our live stream. So let’s close this out and we’re gonna go over here to our livestream capture settings.
And you’ll see, we now have an option to set up the routing for our audio here. We can choose which pro presenter audio channels are being sent to the left right mix for our livestream. Now you can see, you can send multiple audio channels to the left right mix, and they’ll just get added together. Or in our situation, we only wanna send pro presenters channels three and four, not one and two. So we’ll just turn these off.
And now just channels three and four are being sent to our live stream, which is our input from our audio console with our final broadcast mix. Now that first example requires us to send audio out of pro presenters channels one and two to an audio console. And then we’re gonna actually receive that same audio back in channels three and four, but this could cause syncing issues depending on what gear and workflow you have, because you’re sending audio out to a console that’s getting processed and then it’s coming back and it’s going through an audio interface.
And so there’s lag. That’s gonna be added in there and your video and audio could get out of sync. So in this next scenario, we’re gonna have the exact same setup. However, we’re gonna automatically mute the stream of audio. That’s coming back to pro presenter. Anytime we play a foreground video.
Now, the only thing we need to change from our previous example is to change our audio input device from on to auto off, which again, automatically disables this audio input when a foreground video with audio is being played. So when I, I click on this video, my audio here that you can see metering in our preview area will be muted. So I’ll click this to play and you’ll see how my audio is muted. And when I clear my video out, my audio comes back, which is really helpful and will give us that perfectly ins sync to audio for our stream.
However, right now, if we go to our capture settings, you’ll see that our audio from our video isn’t being sent because we don’t have pro presenter channels one and two enabled. So we need to reenable channels one and two and leave three and four on as well. This way, when this video file plays, it’s gonna play back through channels one and two, and be sent to our stream mix and our normal mix from our board three and four, anytime a video is not playing will also be sent to our stream mix.
Now, the last example is how to link an audio feed to a video input. So your audio is only heard when your video input is shown. Now the simplest way to do this is by going to our input preferences and selecting a video input. Then on the audio tab for that video input, we can link a audio source to this video input.
So that any time this video input is shown, this audio source is used. You can also change the currently selected audio source to something different if you want here as well. So I’m gonna choose our Scarlet device we’ve been using throughout this video.
And for this example, I’m gonna change the routing so that our first channel from the Scarlet is sent to both the first and second channel of pro presenters audio. That way we get audio playback in the first two channels, instead of just the first one for maybe our live stream or for a recording. Now we need to actually add our video input.
So we’re gonna go down to video input. I’m gonna add in video input one, and I’m gonna select this video input. And you’ll see my audio shows up here with my video. And when I clear my video out, my audio goes away.
Now another way we can do this is by going back to our preferences, I’m gonna actually remove this audio device from this video input. So we’re just gonna say no audio source. And then I’m gonna go to our audio settings for our Scarlet device. And I’m gonna change this to auto on.
Now, what auto on does is it automatically enables an audio input when a linked video input is showing on an audience screen. So I’m gonna select video input one. So now anytime video input one is shown on an audience screen. This audio device will be turned on. So if I click on this, you’ll see it’s being shown, but you’ll notice that my audio’s playing back in channel three. And that’s because if I go to preferences, my audio routing for my Scarlet device is set two channels three and four. If we wanted to put it back in channels one and two, we could do it that way.
And actually it’s in channels one, two, and three, uh, the way we have it set up right now. Now those are both great ways to ensure that your audio is only being heard when video is being shown. Now, before we finish this up, I wanna share two other quick tips with you first, if you wanna send audio out SDI or NDI, click on the audio tab, inside preferences, and at the bottom, you can enable SDI and NDI audio.
You have a custom level and delay just for SDI and NDI, and you have a routing for this. So I’m gonna click on the routing option. And our main audio input into pro presenter again, was coming into pro presenters channels three and four, but maybe I wanna send that to SDI channels one and two. So I can do that here by selecting pro three and four and putting it in our device channels one and two.
The next option is for custom routing for individual audio or video clips. So I’m gonna right click on this video clip and I’m gonna go to inspector and then I’m gonna click on audio and I can change my channel routing. So here we can choose to send this video clip, maybe to pro presenters channels three and four, instead of channels one and two, which it defaults to you have the same option for audio clips.
So I can right click on this audio clip, go to inspector, click on the audio tab here and change my audio routing to change this audio’s playback to any of pro presenters audio channels that we have set up. So now you can present like a pro with the brand new audio engine inside of pro presenter.

.png)
.avif)
Stay Updated with Our Newsletter
Get the latest news, updates, and exclusive offers delivered straight to your inbox.
Questions?
Browse our FAQs or our Knowledge base that we’ve made to answer your questions. Need additional help? Connect with a support team agent!