
In our last article, we took a look at a few of the benefits of automating lyrics with ProPresenter 7. You can read it here. This week we’re going to take a look at how to get started with automating lyrics in ProPresenter 7 with Ableton Live. Let’s get started by looking at what you’ll need to make this happen.
Something to keep in mind with this post… it’s long and comprehensive. Because I believe giving you all of the info you need will set you up for success in the long run! The beauty of an advanced setup like this is that once you set it up, you only ever need to make small changes. You won’t need to spend time setting this up every time you use midi.
What you’ll need
- ProPresenter 7 running on a Mac or PC
- Ableton Live running on a Mac or PC
- Free ProPresenter 7 MIDI Cues Download here https://fromstudiotostage.com/propresenter/
ProPresenter 7 includes the ability to use MIDI for free. If you haven’t upgraded yet to ProPresenter 7, now is a perfect time. While you can run Ableton Live and ProPresenter 7 on the same machine, I would personally suggest running these on separate computers.
You’ll also need a free ProPresenter MIDI cues file. While you could create your own cues file, or manually create cues for each song, this cues file will save you hours of effort and will speed up your process.
While any edition of Ableton Live will work for this, I always suggest using Standard if you’re running tracks in Ableton Live. Any version of Live will work, but there are some workflow enhancements in Ableton Live 10 (and even more soon to release with Live 11) that will make the upgrade worth it.
Making the Connection
This depends slightly on your exact setup, but you’ll need to find a way to connect Ableton Live to ProPresenter so that you can send MIDI to ProPresenter.
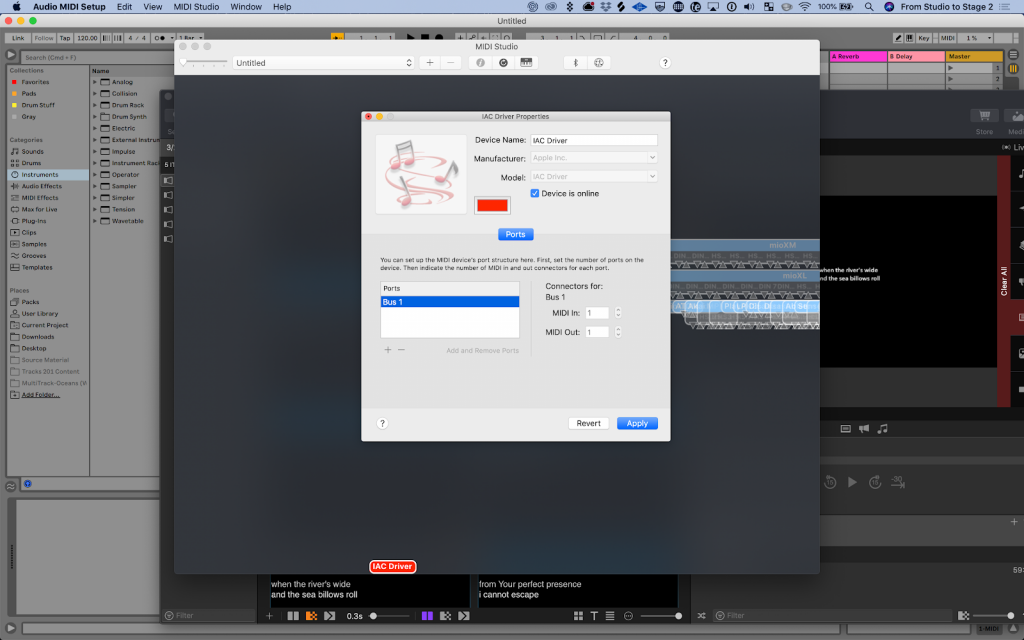
If you’re using Ableton Live on the same machine as ProPresenter you can use a Virtual MIDI Driver to send MIDI from Ableton Live to ProPresenter. On PC you can use LoopBe 1. On Mac, there is a free virtual utility included with your Mac, IAC Driver. Check out this video to see how to set up and enable the IAC Driver on your Mac.
While this setup is perhaps the easiest, most of us are using ProPresenter on a separate computer, perhaps in a video booth or at Front of House. For this setup, we’ll want to send MIDI over an Ethernet cable.
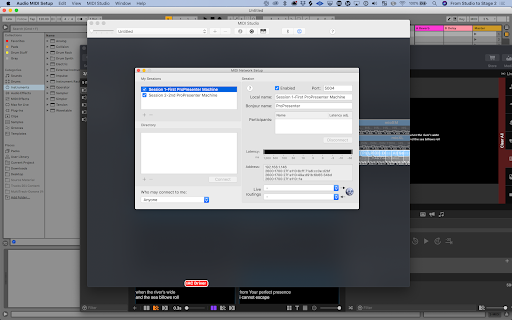
To send MIDI a long distance without any additional purchases, you can use RTP MIDI to send MIDI over an Ethernet cable. On PC you can use RTP MIDI. On Mac Network MIDI is included for free on your computer. Check out this video to see how to set up RTP MIDI on mac. https://youtu.be/1utOxYEPzRA . Can’t find Network MIDI on your Mac? Check out this video: https://youtu.be/rqO-vPXsfDE.
You can connect an Ethernet cable directly between both machines, or connect both machines to the same network. Connecting both machines to the same network is incredibly helpful in situations where ProPresenter is in a video control room in a different part of your campus. Connect both machines to ethernet ports on the network and they’ll be able to see each other.
One other option you may want to consider if you’re willing to purchase some additional hardware is to create a redundant MIDI and tracks setup.
You can easily do that with a PlayAudio12 audio interface and a MioXM or MioXL MIDI interface from iConnectivity.
Connect these interfaces with an ethernet cable and they will automatically reconnect each time they turn on. No need to visit Network MIDI to reconnect each time you plug back in your machine.
As a bonus, when you’re using the PlayAudio12, you can run an additional computer as backup and have it switch automatically to the backup computer. In this setup, if one computer goes down, the other computer keeps sending audio and MIDI to ProPresenter.
Network MIDI setup with PlayAudio12 and MIDI4+
Using the PlayAudio12 with Ableton Live
With our computers connected to each other, let’s make some final configurations to ProPresenter and Ableton Live.
Adding our MIDI Device
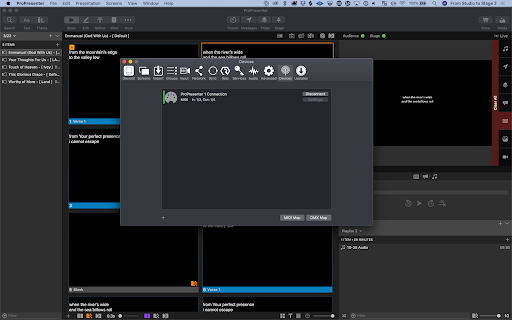
In ProPresenter 7, we’ll want to add our MIDI module under the “Devices” tab. Press the plus icon and choose MIDI.

Next, you can name your MIDI connection, enable “auto-reconnect” and choose the source and destination.
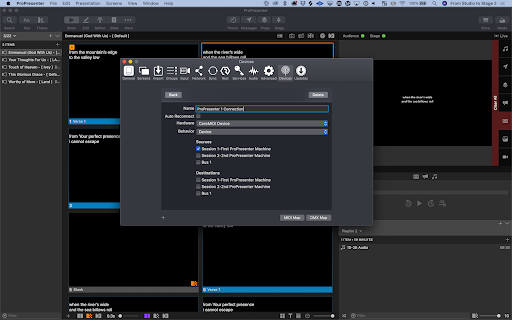
While it’s possible to also send MIDI from ProPresenter, to control lyrics with Ableton Live you’ll only need to enable the source.
Hit back and then “Connect” to enable ProPresenter to start listening for MIDI notes.
Now, let’s confirm our MIDI Template and MIDI map settings are correct.
MIDI Map Settings
Before we start programming our song, you’ll want to check that your MIDI map settings in ProPresenter 7 match the cues file you’re using.
Open preferences in ProPresenter 7, click ‘Devices”, and “MIDI map”.
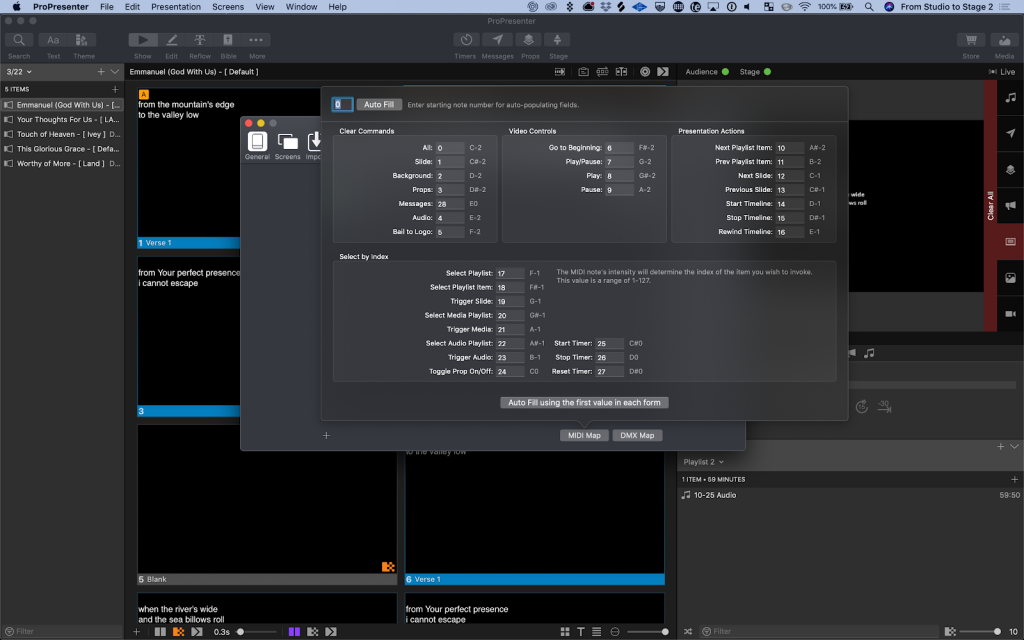
From there confirm your settings match the screenshot below. Most importantly, you’ll want to make sure the cues start at 0 and go up to 27.
The newest cue in ProPresenter 7, the “Messages” cue should be 28.
These values represent the MIDI notes of the MIDI cues in the template you downloaded. With these settings matching, we’re now ready to quickly program our songs in Ableton Live!
Enabling your output in Ableton Live
In Ableton Live, navigate to your MIDI preferences and enable Track on the output of your connection to ProPresenter.
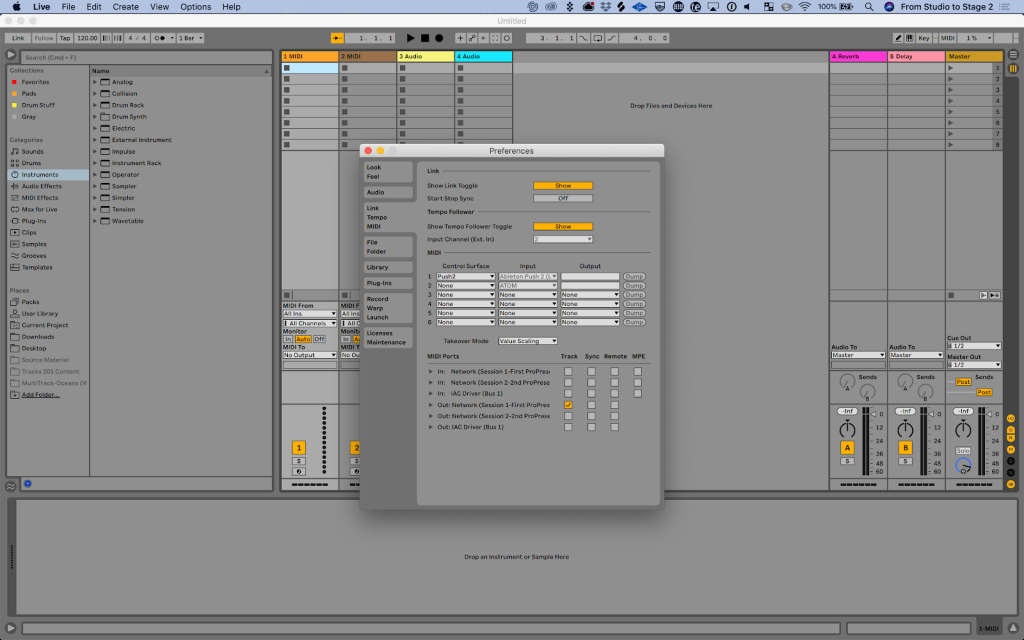
In the example below, my connection is named “Network (Session 1-First ProPresenter)”. I’ve enabled “Track” on that output so I can send MIDI from Live’s track to ProPresenter using this connection type.
Now, let’s talk about programming cues in Ableton Live.
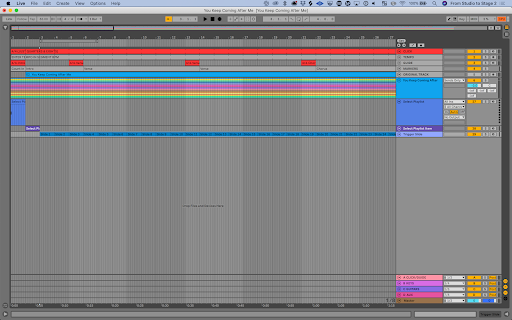
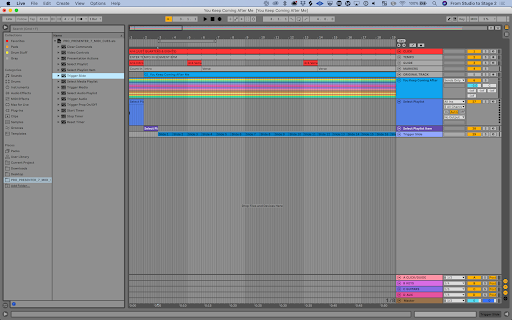
Programming in Ableton Live
To trigger a slide in ProPresenter 7 from Ableton Live you simply drag a slide cue from your template into an empty MIDI track in Ableton Live and make sure to set the output of your MIDI track to the output we enabled previously in preferences.

When you press play in Ableton Live you’ll see the slide you added in Ableton automatically trigger once it hits the MIDI cue you added in.
Open a song file in Ableton Live and add cues throughout your song. Be sure to include Select Playlist and Select Playlist Item to ensure you’re always triggering the correct song.
While the process of programming is pretty straightforward, here are a few suggestions I have:
- Add the folder that contains the MIDI cues file to your browser in Live so you can quickly drag MIDI cues in and place them on the timeline. This makes programming so quick and easy.
Here’s a video that shows how to add content to your browser: https://www.youtube.com/watch?v=V1F6SMh8Igs
- Create an individual Ableton session for each song in Ableton Live. Drag your cues into that file, save them, and then build your set from that file. To get a head start, buy your songs from MultiTracks.com so you get an Ableton file with locators already in your set.
- Sync up the original audio recording to your Ableton Live song file. This will allow you to place cues while listening to the vocals, so you can quickly place your cues in the right place.
- Program your cues in Arrangement view. Arrangement View is the best fit in a playback environment but if you’re planning on automating lyrics using MIDi cues, Arrangement is a must. You can drop cues right on the timeline and use locators to quickly find your place. When you need to adjust a cue, no need to do the math to figure out where to go, jump to the verse directly and shift your cue to the correct location.
- Use “absolute” programming vs. “relative” programming. While you can use “previous” and “next” cues to select slides, I always suggest you use exact cues instead. At the start of every song add a Select Playlist cue and Select Playlist Item cue so you always trigger the correct playlist and correct song in that playlist. For each lyric cue, add the exact slide number for that slide. This way as you navigate through your song you can jump ahead or repeat a section and you’ll always be on the right slide.
Building a Set
For the best experience during a service, you can load the songs you need for that Sunday into an Ableton Live set. This allows you to get your transitions perfect and lets you create a “hands-off” experience.
With your songs loaded into one file, you can press play and sit back and watch your lyrics trigger perfectly in time.
Best of all, if you’re using Arrangement View you can jump around your arrangement, repeat song sections, and your lyrics will follow along perfectly.
Get Started
Want to get started with this? I’d suggest you download the free ProPresenter cues here: http://fromstudiotostage.com/propresenter/ and then start with one song. During the week connect ProPresenter and Ableton and try it out. Once you and your team see the results, you’ll likely never go back.


.png)
.avif)
Stay Updated with Our Newsletter
Get the latest news, updates, and exclusive offers delivered straight to your inbox.
Questions?
Browse our FAQs or our Knowledge base that we’ve made to answer your questions. Need additional help? Connect with a support team agent!