
Video Transcription
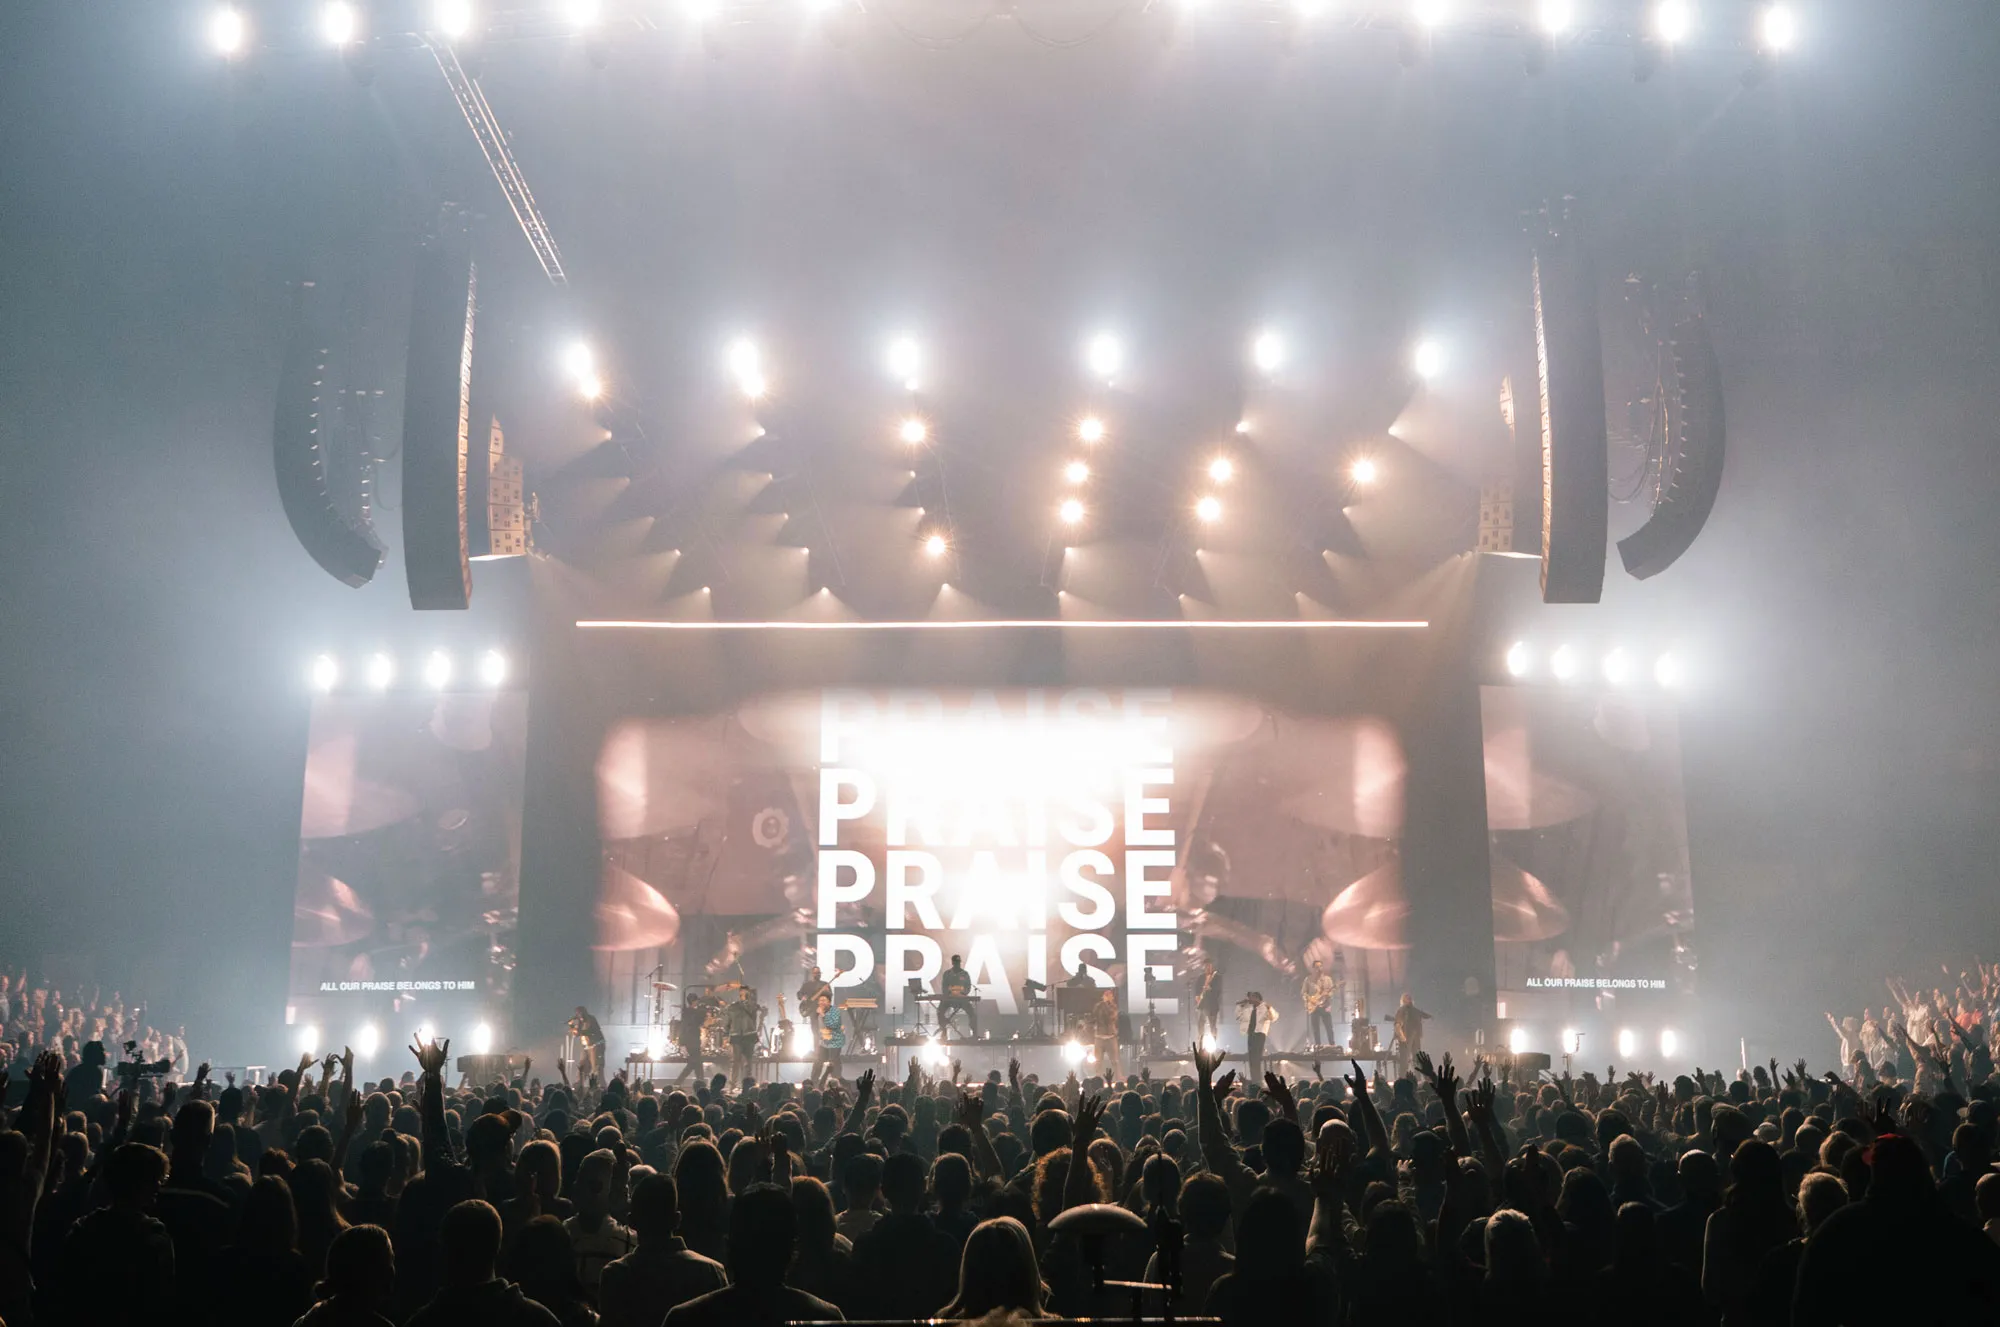
If you want to create a more cinematic streaming experience for your viewers by moving away from that TV studio look towards the feel of a live concert film, you have a lot of things that you need to take into consideration to fully make that switch. Like shooting your video at 24 frames per second or setting your cameras at a low F stop, which gives you that really nice shallow depth of field and getting more creative with the angles of your shots. But one of the other key factors is the actual aspect ratio of your video. Now, TVs and most phones have a wide screen aspect ratio of 16 by nine. But when you go to a movie theater or watch a film at home, you’ll see that the aspect ratio is much wider, usually 2, 3, 5 to one. This ratio changes how shots are framed and sets a different feel for what you’re watching.
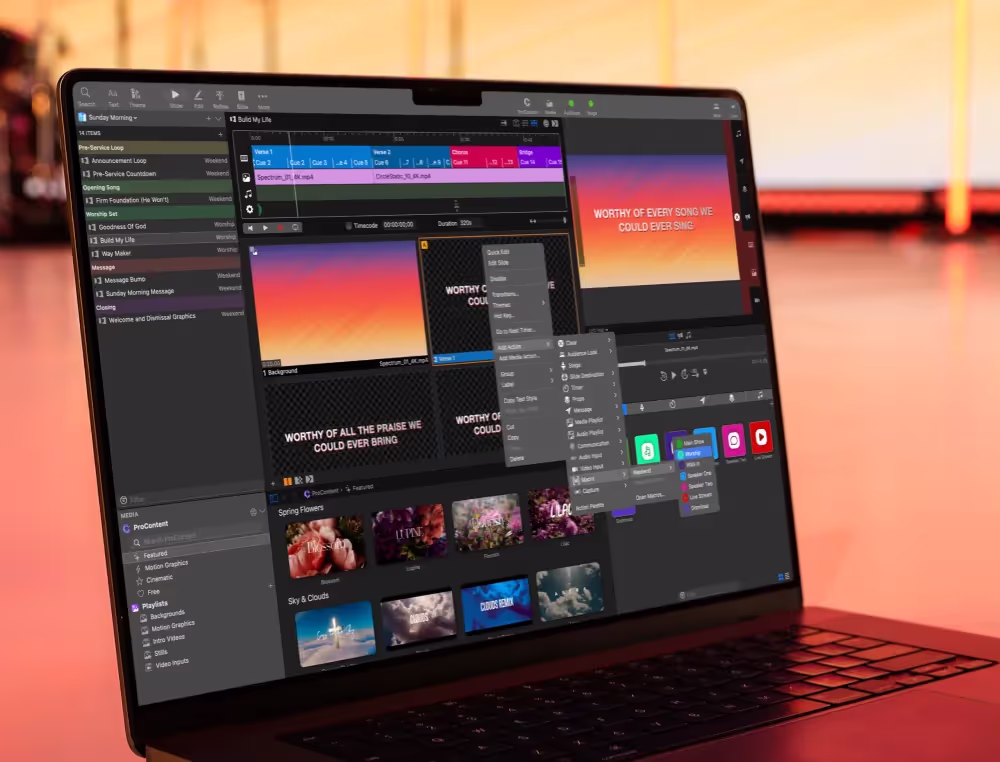
It actually feels more cinematic because of the aspect ratio. Now you could try streaming that ratio, but it gets expensive and complicated. So instead, we can fake the cinema ratio by adding black bars to the top and to the bottom of your stream. And these bars also come in handy because we can show lyrics and other information over top of the bars instead of showing them over our video. So let’s look at how we can add these bars in ProPresenter and how you can take them in and out of the frame based on what you’re showing in a very seamless way. Now to get started, we need to create a theme to reformat how our text looks on our livestream screen. This theme will contain those black bars, and we can use it to move our text to the bottom bar.
So the first thing we need to do is go to theme in the main toolbar and let’s create a new theme set. And we’re going to call this one cinema ratio. And then we can save that theme and it will bring us into the theme editor. Here, we can start creating different individual themes. The first one we’re going to just call lyrics bottom. And the next thing that we want to do is actually add in our cinema ratio bars. And I have a little PNG here that we can use as kind of a template to know how big to create our bars, but you don’t need this PNG because we’re going to create this all inside of ProPresenter. So we’re going to go and add a new shape of a rectangle, and then we can just move this up into the corner and start creating our bar. So we’re going to create one bar and it’s just going to stretch across the entire screen, and we’re going to start pulling it down until we get it around the height that we want it to be, which is around 130.
You could manually type this in, so we could do 130 here. If you wanted to make it a little bit smaller or bigger, you can do that. There’s no one saying that it has to be this perfect size, but we’ll just adjust this to be about 130. And then I’m going to just select this and hit command C and command V to copy and paste this. If you’re on a PC, that would be control C and control V. And then we’ll just drag that bar to the bottom of the screen. Now I don’t need my little template anymore, so I’m going to delete that. And then I’m also going to actually delete this text box because we can use these rectangles as our text box. All you need to do is double click inside of it and type some text. And now it’s a text box with a fill color.
It’s not a shape anymore, it’s a shape that has text inside of it, so it’s a text box. And so now we can start formatting our text to look the way we want it to. So I want to do this in the all caps look. So I’m going to go in here and change my capitalization to all caps and then we could change our font. So we’ll go and select a different font in here. So I’m going to go to maybe editor next and change that to be like demi bold, and maybe we’ll go up to like 48 for our font size. Make that a little bit bigger. You’ll also notice that when we’re using all caps, the characters can get a little tight next to each other. So a lot of times I add in some character spacing. So even like two for the character spacing helps those characters just have a little bit more space around them and look a little bit nicer.
Now the one thing that you’ll notice is that when I type in here, we can add in one more line of text, but it really is tight and doesn’t look great. And so we’re going to instead use a feature of line transformation and we can use this to remove line returns. And now, you’ll see that it’s removed our line returns, and now all of our text is on one line. And so if we have two lines of text, it’ll change it in this look just to be one line of text. Or if you have three lines, it’ll be just one line. But if you’re using more than two lines, you might run into issues where your texts can’t fit in one line all the way across the screen. So we do have one other option we can add in here of scaling, and we’ll just scale the text down to always fit inside this box.
So we’re setting it to make our text always on one line and always fit inside of our bar. The last thing that we want to do is make sure that our text doesn’t go all the way up to the edge. And we can do this by adding some margins in. So we’ll just go in and we’ll add a margin on the left and right of about 20 pixels on each side. And now our texts can’t go all the way up to the edge there. So this is all looking good. Now we could go and change these bars to be black, but I’m going to leave them blue just so we can easily see what’s going on, and then we’ll change them to black at the very end. So we’re going to go back to show. And now we need to utilize that theme on our livestream screen.
And the way that we do that is by using looks, and we can find that under screens and edit looks. We’re going to create a new look for our screens. So when you open up looks, you’ll see all of your screens and all of your layers on each screen. But you’ll notice that the presentation layer has an option here. And this allows you to choose an alternate theme to use on that individual screen. So let’s create a new preset, and I’m going to call this my cinema lyrics. And then I’m going to go and I’m going to add an alternate theme to my livestream screen using our lyrics bottom theme. The other thing that I need to do is I need to make sure to turn off the media layer on the livestream screen. We can leave the video input on. And then on our main output, we probably want to turn the video input off.
And so now all of our layers are set up and we have our alternate theme. And now I can say Make Live. And now we’re utilizing that theme on our screen. And you can see that over here in our looks icon where we can choose our different looks. You’ll see that it’s using our cinema lyrics look. So now when I click on some lyrics, you’ll see on our main output it looks exactly like the slide and it’s two lines of text. But if we go to our livestream screen, you’ll see it’s the blue bars and it’s one line of text at the bottom of the screen. And so as we click through, you’ll see that our text is always transformed down into one line, and it’s always fitting into our screen here, so it looks exactly the way we want it to. Now we could use this theme for our entire stream, but most often you’ll see this type of cinematic look during live music, but not during speaking or teaching moments.
So we want to figure out how to transition these bars in and out. Now we could just turn them on and off, but that’s really obvious and we want to try hide that transition. Now, one way we could do this is by fading the black in your video switcher or clearing all in ProPresenter and then turning the bars on and then fading back in. This is going to hide that transition, but it’s much harder to get the timing just right. The other way we can do this is by smoothly pushing our bars in and out. We can do this in ProPresenter by using object transitions. Now since it might vary when we want our bars to move in and our bars to move out, we need a way to be able to trigger that movement whenever we want. And the way we’re going to do this is by creating a few more themes, one theme for the bars to move in, and another theme for the bars to move out.
And then we can just switch to that theme whenever we want the bars to move in or out. And then we can switch to our static bars that we first created anytime we want the bars to just stay there. So let’s see how this works. So first we need to go back to theme in the main toolbar, and we’ll go to our cinema ratio theme, and we’re going to edit that theme. And then with our first slide selected, we’re going to right click and we’re going to go to duplicates. So we’re going to duplicate that and we’re going to rename this one to bars in. And now we can go through and select our bars and actually add the movement. So I’m going to go to the build options and we’re going to add a build in. So we’re going to add a build, and we have a few different options that we can choose from in here.
But the option that we need to use is a push transition. And so from this one, we want to make sure to choose the option from top. And then for the other one we’re going to add a build. And we’re going to choose push, and we want this one to be from bottom. Now if we select these, you’ll see how fast this movement comes in and out. And we want this to be a lot more subtle and slow. And the one thing that you’ll notice here in this preview is it’s showing how ProPresenter treats this whole screen as the area that’s moving in and out, not just this little sliver of the slide. So it’s not moving this from right off frame into frame, it’s moving it from a whole slide’s worth away from this area. And so it’d be like the top of this image is the part that we’re moving in, and it has to go through all of that animation before it actually adds that little bar part in.
So if we want that to be slow and subtle, we need to change this number to be pretty high. Now we can move this all the way up to five, but I want it to be even more subtle, so I’m going to make it like eight. So we’ll set both of these up to eight. We can just type a number in. And now both of those bars are going to take eight seconds to come in, which will help that movement to be really slow and subtle. So when that bar part at the very top here comes in, it will be nice and slow. Now at the bottom, this is how it’s actually being brought on. So this first one right now is saying on click. Now we can’t really click that on, so we need that to come in with the slide. And then our other one, we want that to come in with the first build.
So with build one, which is our first rectangle. So this one’s going to come in when the slide gets triggered, and this one’s going to come in with that previous build. And you’ll see again how this image is slowly moving up and you can picture how our bar is just that bottom edge of that image. And so that’s why we need to set that number really high.
So now let’s see how this works. So I’m going to go back to show and what we need to do now is create a new look to trigger that theme to be shown. So we’re going to go back to screens and to edit looks. And here we’re going to duplicate our cinema lyrics looks. I’ll right click on cinema lyrics. We’re going to duplicate that. And I’m just going to call the cinema lyrics in. So this is our movement in, and all we need to do here is now we can change which theme we’re using.
We’re going to change this to bars in. All of our other settings are the same because we can duplicate that and now I can just make that live. So now let’s see what that movement looks like. So I’m going to click on this slide and you’ll see that nothing’s happening here for a few seconds, but then we’ll see right at the end here, we’ll see those bars moved in nice and slow and subtle just the way that we wanted it to. So now we need to repeat that process and create another theme to move the bars out. So again, we’ll go back to theme and we’ll go to our cinema ratio and we’ll edit that. And then we can duplicate our bars in. So I’m going to duplicate bars in, and we’ll name this bars out so we can name that bars out, and then we can select this and we can change our build.
But instead of this being a build in, we need to set this to be a build out because this is what happens after the object has been shown because this is what happens before the object is shown. We need to do what’s going to happen after the object is shown. So we’re going to delete the build in and we’re going to add a build out. We’re going to use from our recents here. We can use our push, and we’re going to have this push from the bottom to the top so that it moves this upwards. And we’re going to set this one. We’re going to again delete the build in and add a build out. We’re going to set this to push, and we’re going to set this one to be from the top to the bottom. And then again, we need to go in and set this to be that nice slow eight second transition.
So we’ll set that to eight seconds for each. And we can’t forget about the build order here at the bottom. So the first one, we need to change the start and you’ll see that there’s no width slide option. So we have to go after transition. So after the slide has transitioned in, I want you to do this transition. So it will automatically happen. And again here we can say with build one. So now these will both go together after the transition, and then they’ll do that slow movement in. Now since these are at the edges and they’re the first thing to move away, you’ll see that our animation happens right away because this part of the full screen will move off right away. And so now we can go and create another look. So we’ll go back to screens and we’ll say edit looks, and we’re going to duplicate that cinema lyrics in.
So we’ll duplicate that. We’ll name this one lyrics out, and then we just need to change that from our bars into our bars out. Now what you’ll notice as soon as I make this live, it’s going to move those bars out here. So I’ll make that live and you’ll see how our bars move out exactly the way we want it to. Now you might be wondering, why do we need those three different looks to be able to accomplish this? Well, let’s look at how this works because right now our cinema bars out is selected. You can see over here by our look icon, which look is currently active. And that animation is applied to every single slide change. And so if I click on this slide, it’s going to show the lyrics and then it’s going to push them out. And if I click on this slide, it’s going to show the lyrics and push them out.
And it’s going to do that for every single slide change. That’s not what we want. So we need to have movement in on one slide and then static, no movement, bars just stay there on another. And then finally, movement out on the last slide. So let’s see how that looks. Let’s set up a song the way you would probably do this for your event. So we’re going to right click on the slide. We’re going to add an action of an audience look of lyrics in. And then our first slide of the song, we’re going to add another action of audience look. And we’re just going to set this to lyrics. This is our static one where it’s just the bars, nothing’s moving around. And then finally, at the end of the song, during our outro, I’m going to add another action of audience look and cinema lyrics out. So now let’s see how all of this functions together.
So I’ll select this. And on our main screen, the motion background showing that’s not showing here on our livestream because we set that in our looks, but you’ll see how our bars move in. And then when I go to that next slide, you’ll see our tech shows up. And now our bars are staying static. They’re not changing because that’s the look we’re using right now. So I can switch slides and our bars are going to stay. They’re not going to go away until we get down to the very end of the song. And then when we switch to this different look, our bars out, we switch to that and our bars go away. So that’s how you would set up your event to have your bars move in and out. So basically, during your first song, on your first slide, you’ll move your bars in, and then you’ll set your bars to be static on the next slide.
And then on your last song on the very last slide, you’ll set your bars to move out. And so you just need to adjust that for your songs in your playlist. And then you can kind of have that be automated and your operator doesn’t even need to worry about moving them in and out. However, your operator can change this at any time. So let’s say the bars are on and you’re like, we need to get the bars off because we’re going to switch to something different on the fly. They can go over here and click on the active audience look and just say cinema lyrics out. And they can just press that and it’s just going to take that right off the screen whenever they want. The other way that you could do this is by creating a macro. So we could go in here and create a macro and we’ll just call this bars out and we can right click on this and add one of those actions.
So we’ll add our audience look action of cinema lyrics out. And so now let’s say our bars are showing, so they’re on there and we need to just quick get those off. We can just click on bars out and it will take the bars out. So you can utilize those macros or you can utilize actions on your slides. Now the last thing that we need to do is we need to go back to our theme editor. So I’m going to click on the more button in our toolbar and go to theme editor. And we need to go through and change these from blue. We don’t want these to be blue, we want these to be black. So we’ll go back to our shape properties and we’ll switch these back to black. I left them blue just so we could clearly see what’s happening, but we can go in here and change these all back to black.
So all we need to do is just go adjust these and then we can take a look at what this looks like with some actual concert footage. So we have our concert footage here, and you’ll see how our bars are going to kind of slowly move in so we can kind of hide that transition. And then we can start going through our lyrics and we can change our slides here and you’ll see how all of our text is on one line. And then as we finish up our song, we’ll go down to the last slide and then we can take our bars out and they’re going to slide out of frame as we finish our song up.
Now finally, here’s a couple things to keep in mind if you start using the cinema ratio for your stream. First, if you’re sending lyrics to a video switcher and you currently use a Illuma Key to key out the background to show those lyrics over top of your video, you’re probably going to have issues since Illuma Key is removing anything black, which means the black bars would actually be keyed out and you wouldn’t get the effect at all.
So instead, you should use a chroma key or an alpha key, which won’t key those bars out. Also, you got to remember that these bars are blocking out part of the image, and so you need to start framing your shots differently when you’re using the cinema bars. This is part of that cinematic look that you’re starting to frame those shots differently. So you have to train your camera operators on how to adjust their shots when you’re using those bars. But now you know how to use ProPresenter to make your stream look even more cinematic. And don’t forget, you can find more training and tutorials at propresenter.com.

.png)
.avif)
Stay Updated with Our Newsletter
Get the latest news, updates, and exclusive offers delivered straight to your inbox.
Questions?
Browse our FAQs or our Knowledge base that we’ve made to answer your questions. Need additional help? Connect with a support team agent!